Wednesday, October 27, 2010

WPF - Find Control in ControlTemplate in WPF

In some scenario that requires we have to find a control within a ControlTemplate. To do that, you use Template.FindName method.

Let see how to find control from ControlTemplate.

Step 1
Create a WPF application and give a solution name as SolFindControlInControlTemplate.

Step 2
Add a button control on window,it is look like this


<Window x:Class="SolFindControlInControlTemplate.MainWindow"
        xmlns="http://schemas.microsoft.com/winfx/2006/xaml/presentation"
        xmlns:x="http://schemas.microsoft.com/winfx/2006/xaml"
        Title="Find Control in Control Template" Height="350" Width="525">
 <Grid>
        <Button Content="ChangeColor" Height="43" HorizontalAlignment="Left" Margin="155,126,0,0" Name="btnColor" VerticalAlignment="Top" Width="208"/>
    </Grid>
</Window>

Step 3
Create a simple ControlTemplate for button control,it is look like this

    <Window.Resources>

        <ControlTemplate x:Key="BtnControlTemplate" TargetType="Button">
            
            <Grid>
                
                <Rectangle x:Name="ButtonRecTangle" Stroke="Black" StrokeThickness="3" RadiusX="10" RadiusY="10" Fill="Orange">
                     
                </Rectangle>

                <!--For Display Text(Content) in button -->
                <Viewbox>
                    <!--set the button text which user will define on button-->
                    <ContentControl Content="{TemplateBinding Button.Content}"></ContentControl>

                </Viewbox>

            </Grid>
            
        </ControlTemplate>

    </Window.Resources>

Step 4
Apply ControlTemplate on button control,it is look like this

    <Grid>
        <Button Content="ChangeColor" Height="43" HorizontalAlignment="Left" Margin="155,126,0,0" Name="btnColor" VerticalAlignment="Top" Width="208" Template="{StaticResource BtnControlTemplate}" Click="btnColor_Click" />

    </Grid>

Step 5
Find a rectangle control in the ControlTemplate of btnColor and change the rectangle color,it is look like

  private void btnColor_Click(object sender, RoutedEventArgs e)
        {
            try
            {
                // Find a rectangle control within a ControlTemplate by using Template.FindName method
                Rectangle RecTangleObj =(Rectangle) btnColor.Template.FindName("ButtonRecTangle", btnColor);

                // Fill the rectangle color
                RecTangleObj.Fill = System.Windows.Media.Brushes.Red;        
            }
            catch (Exception ex)
            {
                MessageBox.Show(ex.Message);   
            }
        }

Full Code

1. XAML Code

<Window x:Class="SolFindControlInControlTemplate.MainWindow"
        xmlns="http://schemas.microsoft.com/winfx/2006/xaml/presentation"
        xmlns:x="http://schemas.microsoft.com/winfx/2006/xaml"
        Title="Find Control in Control Template" Height="350" Width="525">
    
    <Window.Resources>

        <ControlTemplate x:Key="BtnControlTemplate" TargetType="Button">
            
            <Grid>
                
                <Rectangle x:Name="ButtonRecTangle" Stroke="Black" StrokeThickness="3" RadiusX="10" RadiusY="10" Fill="Orange">
                     
                </Rectangle>

                <!--For Display Text(Content) in button -->
                <Viewbox>
                    <!--set the button text which user will define on button-->
                    <ContentControl Content="{TemplateBinding Button.Content}"></ContentControl>

                </Viewbox>

            </Grid>
            
        </ControlTemplate>

    </Window.Resources>  
    
    <Grid>
        <Button Content="ChangeColor" Height="43" HorizontalAlignment="Left" Margin="155,126,0,0" Name="btnColor" VerticalAlignment="Top" Width="208" Template="{StaticResource BtnControlTemplate}" Click="btnColor_Click" />
    </Grid>
</Window>

2. Code behind

using System;
using System.Collections.Generic;
using System.Linq;
using System.Text;
using System.Windows;
using System.Windows.Controls;
using System.Windows.Data;
using System.Windows.Documents;
using System.Windows.Input;
using System.Windows.Media;
using System.Windows.Media.Imaging;
using System.Windows.Navigation;
using System.Windows.Shapes;

namespace SolFindControlInControlTemplate
{

    public partial class MainWindow : Window
    {
        public MainWindow()
        {
            InitializeComponent();
        }

        private void btnColor_Click(object sender, RoutedEventArgs e)
        {
            try
            {
                // Find a rectangle control within a ControlTemplate by using Template.FindName method
                Rectangle RecTangleObj =(Rectangle) btnColor.Template.FindName("ButtonRecTangle", btnColor);

                // Fill the rectangle color
                RecTangleObj.Fill = System.Windows.Media.Brushes.Red;        
            }
            catch (Exception ex)
            {
                MessageBox.Show(ex.Message);   
            }
        }

       
    }
}

Run the project.

Download
Download Source Code

Monday, October 11, 2010

Ninja Art - Turn off Monitor

I will show you how to turn off monitor through programming code.

Step 1
Create a WPF Application and give solution name SolTurnOffMonitor.

Step 2
Add a button on window,it is look like this


<Window x:Class="SolTurnOffMonitor.MainWindow"
        xmlns="http://schemas.microsoft.com/winfx/2006/xaml/presentation"
        xmlns:x="http://schemas.microsoft.com/winfx/2006/xaml"
        Title="TurnOffMonitor" Height="100" Width="200" Background="Gray" WindowStartupLocation="CenterScreen" WindowStyle="ToolWindow" ResizeMode="NoResize">
    <Grid>
        <Button Content="TurnOff Monitor"  Name="btnTurnOff" Foreground="Salmon" Click="btnTurnOff_Click" MouseMove="btnTurnOff_MouseMove">
            <Button.Background>
                <LinearGradientBrush EndPoint="0.5,1" MappingMode="RelativeToBoundingBox" StartPoint="0.5,0">
                    <GradientStop Color="#FFF7B80D"/>
                    <GradientStop Color="#FF1D1D1B" Offset="1"/>
                </LinearGradientBrush>
            </Button.Background>
        </Button>
    </Grid>
</Window>

Step 3
Go to the code behind and add the following code,it is look like this

  public partial class MainWindow : Window
    {
        #region Declaration

       
        const int SC_MONITORPOWER = 0xF170;
        const int WM_SYSCOMMAND = 0x0112;
        const int MONITOR_ON = 2;
        const int MONITOR_OFF =-1;
        const int MONITOR_STANBY = 1;


        [System.Runtime.InteropServices.DllImport("user32.dll")]
        public static extern int SendMessage(int hWnd, int Msg, int wParam, int lParam);


        #endregion

        #region Constructor
        public MainWindow()
        {
            InitializeComponent();
        }
        #endregion

        #region Method
        /// <summary>
        /// Turn off Monitor
        /// </summary>
        private void TurnOffMonitor()
        {
            try
            {
                SendMessage(MONITOR_OFF, WM_SYSCOMMAND, SC_MONITORPOWER, MONITOR_ON);
            }
            catch (Exception ex)
            {
                throw new Exception(ex.Message);
            }
        }

        #endregion

        #region Events
        /// <summary>
        /// When the button click
        /// </summary>
        /// <param name="sender"></param>
        /// <param name="e"></param>
        private void btnTurnOff_Click(object sender, RoutedEventArgs e)
        {
            try
            {
                TurnOffMonitor(); 
            }
            catch (Exception ex)
            {
                MessageBox.Show(ex.Message);   
            }
        }

        /// <summary>
        /// when the mouse move on button
        /// </summary>
        /// <param name="sender"></param>
        /// <param name="e"></param>
        private void btnTurnOff_MouseMove(object sender, MouseEventArgs e)
        {
            try
            {
                TurnOffMonitor(); 
            }
            catch (Exception ex)
            {
                MessageBox.Show(ex.Message);   
            }
        }
        #endregion
    }

SendMessage function
The SendMessage function calls the window procedure for the specified window and does not return until the window procedure has processed the message.

Note
Turn off monitor when user click on button or move mouse cursor point to the button and turns them back on when the mouse moves outside the window.

Download
Download Source Code

Sunday, October 10, 2010

ASP.net - Custom paging in gridview by using LINQ to SQL

Paging gridviews are the most sought after functionalities in most of the web applications.When it comes to performance, for datacentric applications its very important to implement the custom paging mechanism instead of the default paging for gridviews. This is because the page becomes heavily loaded when thousands of records are fetched at a strech from the
database.

To overcome this, we must implement a "Custom paging" mechanism which brings page of data requested by the user.

What is LINQ to SQL classes?
LINQ to SQL classes that are mapped to database tables and views are called entity classes. The entity class maps to a record, whereas the individual properties of an entity class map to the individual columns that make up a record. Create entity classes that are based on database tables or views by dragging tables or views from Server Explorer/Database Explorer onto the Object Relational Designer (O/R Designer). The O/R Designer generates the classes and applies the specific LINQ to SQL attributes to enable LINQ to SQL functionality.
In short, LINQ to SQL provides an Object-Relational Mapping (O/R Mapping) which maps objects of different type system.

Let see how to create custom paging in gridview by using LINQ to SQL.

Step 1
Download northwind database from the following link.
http://www.microsoft.com/downloads/details.aspx?FamilyID=06616212-0356-46a0-8da2-eebc53a68034&displaylang=en


Step 2
Attach a northwind database into MS-SQL server.

Step 3

Create a Web application and give solution name as SolCustompagingLINQ.

Step 4

In this example we have to bind employee data from northwind database into a gridview. add a gridview on page it is look like this


<asp:ScriptManager ID="ScriptManager1" runat="server">
        </asp:ScriptManager>  

        <asp:UpdatePanel ID="UpdatePanel1" runat="server">
            <ContentTemplate>
                <asp:GridView ID="GvEmployee" runat="server" AllowPaging="True" CellPadding="4" 
                    EnableModelValidation="True" ForeColor="#333333" GridLines="None" PageSize="5">
                    <AlternatingRowStyle BackColor="White" />
                    <EditRowStyle BackColor="#7C6F57" />
                    <FooterStyle BackColor="#1C5E55" Font-Bold="True" ForeColor="White" />
                    <HeaderStyle BackColor="#1C5E55" Font-Bold="True" ForeColor="White" />
                    <PagerStyle BackColor="#666666" ForeColor="White" HorizontalAlign="Center" />
                    <RowStyle BackColor="#E3EAEB" />
                    <SelectedRowStyle BackColor="#C5BBAF" Font-Bold="True" ForeColor="#333333" />
                </asp:GridView> 
 
            </ContentTemplate> 
        </asp:UpdatePanel>   

Step 5
Add a connectionstring on web.config file,it is look like this
<connectionStrings>
        <add name="ConStr" connectionString="Data Source=shree\shree;Initial Catalog=Northwind;Integrated Security=True" providerName="System.Data.SqlClient"/>
    </connectionStrings>

Step 6
Add app_code folder in the solution and add a new folder inside the app_code folder and give folder name as ORD,it is look like this


Click on image for better view


Step 7
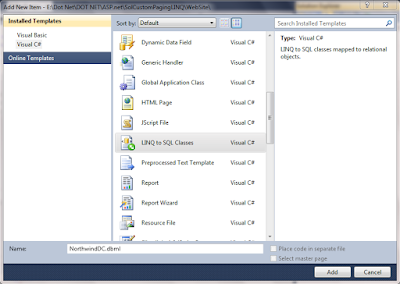
Add a Linq to Sql class,Select the ORD folder,right click on Add new Item,select LINQ to SQL classes from installed Visual Studio templates and name it NorthwindDC and click on add button,it is look like this


Click on image for better view


Step 8
Open a O/R Designer by double click on NorthwindDC.dbml,it is look like this


Click on image for better view


Click on image for better view


Visual stdio provides an object-relational mapping designer,called the O/R Designer which allows you to visually design the object to database mapping.

Step 9
Create a Employee object.
in this example we have to work with employees table from the northwind database,create a employee object that will use LINQ to SQL to map to this table.go to the server explorer,select northwind database,go to the tables and select Employees table,it is look like this


Click on image for better view


Drag and drop Employee table from Server explorer onto the design surface of the O/R Designer,it is look like this


Click on image for better view


Step 10
Create a Employee class in app_code folder for retriving an employee data from database,it is look like this
using System;
using System.Collections.Generic;
using System.Linq;
using System.Web;
using System.Collections;

public class Employee
{
    #region Methods

   /// <summary>
    /// Get the Employee data from northwind database
   /// </summary>
    /// <param name="StartRowIndex">StartRowIndex provided by ObjectDataSource Control</param>
    /// <param name="MaximumRows">MaximumRows provided by ObjectDataSource Control</param>
   /// <returns>IList</returns>
    public IList GetEmployeesData(int StartRowIndex, int MaximumRows)
    {
        try
        {
            // Create a object of DataContext and specify the connectionstring in datacontext constructor
            // The NorthwindDCDataContext object is an object of type of DataContext
            // This object works with the connectionstring and connect to the database for any required operation

            ORD.NorthwindDCDataContext DC = new ORD.NorthwindDCDataContext(System.Configuration.ConfigurationManager.ConnectionStrings["ConStr"].ConnectionString);

            // SELECT LINQ Query
            var Query = (from Q in DC.Employees
                              select new
                              {
                                FirstName=Q.FirstName,
                                LastName=Q.LastName,
                                Title=Q.Title,
                                City=Q.City,
                                Country=Q.Country 
                              }
                           ).Skip(StartRowIndex).Take(MaximumRows);

            return Query.ToList(); // return Query
        }
        catch (Exception ex)
        {
            throw new Exception(ex.Message);  
        }
    }

   /// <summary>
   /// Count total rows of employees table.
   /// </summary>
   /// <returns>int</returns>
    public int GetEmpolyeesDataCount()
    {
        try
        {
            // Create a object of DataContext and specify the connectionstring in datacontext constructor
            // The NorthwindDCDataContext object is an object of type of DataContext
            // This object works with the connectionstring and connect to the database for any required operation

            ORD.NorthwindDCDataContext DC = new ORD.NorthwindDCDataContext(System.Configuration.ConfigurationManager.ConnectionStrings["ConStr"].ConnectionString);

            // Count Query
            int TotalCount = (from Q in DC.Employees
                              select Q
                                ).Count();

            return TotalCount; // return Count
        }
        catch (Exception ex)
        {
            throw new Exception(ex.Message);  
        }
    }

    #endregion
}

GetEmployeesData
The LINQ query that fetches the employee records.We use Skip and Take operator to fetch the records that belongs to the current page.

GetEmpolyeesDataCount
The GetEmpolyeesDataCount() method will get the number of employees available in the table using LINQ query to construct the page numbers.

Step 11
Now we can configure the ObjectDataSource control with these methods.it is look like this


<asp:ObjectDataSource ID="ObjectDataSource1" runat="server"
                 EnablePaging="true" TypeName="Employee"
                 SelectMethod="GetEmployeesData" SelectCountMethod="GetEmpolyeesDataCount"
                 StartRowIndexParameterName="StartRowIndex" MaximumRowsParameterName="MaximumRows"      
                >
                
                </asp:ObjectDataSource> 

Configuring ObjectDataSource Control for Custom Paging

1.Type Name - This property needs to be configured with the class that has the implementation of SelectCountMethod and SelectMethod.

2.EnablePaging - This property accepts a Boolean to enable paging with ObjectDataSource control.

3.SelectCountMethod - We need to specify the name of the method that can fetch the total number of records available in the database.

4.SelectMethod - This property will accept the name of the method that fetches actual database record.

5.StartRowIndexParameterName - This property will accept the start row index of the record to fetch from database.

6.MaximumRowsParameterName - This property will accept the maximum number of rows that can be fetched at one time. This will be equivalent to page size.


Step 12
Bind the employee data in gridview.it is look like this

protected void Page_Load(object sender, EventArgs e)
    {
        try
        {
            if (IsPostBack == false)
            {
                BindEmployeeData(); 
            }
        }
        catch (Exception)
        { 
        }
    }

    #region Methods
    /// <summary>
    /// Bind the employees data into gridview
    /// </summary>
    private void BindEmployeeData()
    {
        try
        {
            GvEmployee.DataSourceID = ObjectDataSource1.ID;
            GvEmployee.DataBind();  
        }
        catch (Exception ex)
        {
            throw new Exception(ex.Message);  
        }
    }

    #endregion

Run the project.

Download
Download Source Code

Full Code

1. .aspx code

<%@ Page Language="C#" AutoEventWireup="true"  CodeFile="Default.aspx.cs" Inherits="_Default" %>

<!DOCTYPE html PUBLIC "-//W3C//DTD XHTML 1.0 Transitional//EN" "http://www.w3.org/TR/xhtml1/DTD/xhtml1-transitional.dtd">

<html xmlns="http://www.w3.org/1999/xhtml">
<head runat="server">
    <title></title>
</head>
<body>
    <form id="form1" runat="server">
    <div>
        <asp:ScriptManager ID="ScriptManager1" runat="server">
        </asp:ScriptManager>  

        <asp:UpdatePanel ID="UpdatePanel1" runat="server">
            <ContentTemplate>
                <asp:GridView ID="GvEmployee" runat="server" AllowPaging="True" CellPadding="4" 
                    EnableModelValidation="True" ForeColor="#333333" GridLines="None" PageSize="5">
                    <AlternatingRowStyle BackColor="White" />
                    <EditRowStyle BackColor="#7C6F57" />
                    <FooterStyle BackColor="#1C5E55" Font-Bold="True" ForeColor="White" />
                    <HeaderStyle BackColor="#1C5E55" Font-Bold="True" ForeColor="White" />
                    <PagerStyle BackColor="#666666" ForeColor="White" HorizontalAlign="Center" />
                    <RowStyle BackColor="#E3EAEB" />
                    <SelectedRowStyle BackColor="#C5BBAF" Font-Bold="True" ForeColor="#333333" />
                </asp:GridView> 

                <asp:ObjectDataSource ID="ObjectDataSource1" runat="server"
                 EnablePaging="true" TypeName="Employee"
                 SelectMethod="GetEmployeesData" SelectCountMethod="GetEmpolyeesDataCount"
                 StartRowIndexParameterName="StartRowIndex" MaximumRowsParameterName="MaximumRows"      
                >
                
                </asp:ObjectDataSource>  
            </ContentTemplate> 
        </asp:UpdatePanel>   
    </div>
    </form>
</body>
</html>

2. Code behind

using System;
using System.Collections.Generic;
using System.Linq;
using System.Web;
using System.Web.UI;
using System.Web.UI.WebControls;

public partial class _Default : System.Web.UI.Page 
{
    protected void Page_Load(object sender, EventArgs e)
    {
        try
        {
            if (IsPostBack == false)
            {
                BindEmployeeData(); 
            }
        }
        catch (Exception)
        { 
        }
    }

    #region Methods
    /// <summary>
    /// Bind the employees data into gridview
    /// </summary>
    private void BindEmployeeData()
    {
        try
        {
            GvEmployee.DataSourceID = ObjectDataSource1.ID;
            GvEmployee.DataBind();  
        }
        catch (Exception ex)
        {
            throw new Exception(ex.Message);  
        }
    }

    #endregion
}

C#.net - IDisposable Interface

What is Grabage Collection?
Garbage collection is a CLR (Common Language Runtime) feature,which automatically manage memory.CLR automatically release objects when they are no longer in ues and refernced.CLR runs on non-deterministic to see the unused objects and cleans them.

What is IDisposable Interface?
IDisposable is an interface defined in the System namespace. The interface defines a single method, named "Dispose", that is used to perform clean-up activities for an object when it is no longer required. The method may be called manually, when an object's work is finished, or automatically during garbage collection.

The IDisposable interface was designed to provide a standard way to release unmanaged resources. These are resources that the garbage collector does not manage on our behalf and is unable to clean up automatically. They include items such as streams, files, database connections and handles. If the memory and system resources that they use are not properly released, your software may suffer from memory leaks or problems due to locked resources.

Let see how to implement IDisposable Interface.

Step 1
Create a console application.

Step 2
Add a new class name DisposeDemo and implement IDisposable Interface,it is look like this


 public class DisposeDemo : IDisposable
    {
        #region Declaration

        private Boolean IsDisposed = false;
        private Stream StreamObj = null;

        #endregion

        #region Dispose Method
        /// <summary>
        /// All managed and unmanaged resources can be released
        /// 
        /// If disposing equals true, the method has been called directly
        /// or indirectly by a user's code. Managed and unmanaged resources
        /// can be disposed.

        /// If disposing equals false, the method has been called by the
        /// runtime from inside the finalizer and you should not reference
        /// other objects. Only unmanaged resources can be disposed.

        /// </summary>
        /// <param name="Disposing"></param>
        private void Dispose(Boolean Disposing)
        {
            try
            {
                if (this.IsDisposed == false)
                {
                    if (Disposing == true)
                    {
                        StreamObj.Dispose();  
                    }
                    StreamObj = null; 
                }
                this.IsDisposed = true;
            }
            catch (Exception ex)
            {
                throw new Exception(ex.Message);
            }
        }

        #endregion

        #region IDisposable Member

        /// <summary>
        /// Used to clean up and free unmanaged resources.
        /// </summary>
        public void Dispose()
        {
            try
            {
                Dispose(true);

                // Request that the system not call the finalizer for specified object.
                System.GC.SuppressFinalize(this);
            }
            catch (Exception ex)
            {
                throw new Exception(ex.Message);
            }
        }

        #endregion

        #region Property
        /// <summary>
        /// When the object is disposed then it will throw ObjectDisposedException
        /// it is an optional property.
        /// </summary>
        private  Boolean IsDispose
        {
            get
            {
                Boolean Flag = false;
                try
                {
                    if (IsDisposed == true)
                    {
                        Flag = true;
                        throw new ObjectDisposedException(this.GetType().FullName);
                    }
                }
                catch (Exception ex)
                {
                    throw new Exception(ex.Message);
                }
                return Flag;
            }
        }
       
       
        #endregion

        #region Print Data
        /// <summary>
        /// It will first check the object is disposed or not if object is not dispose then it will print data otherwise it will throw exception.
        /// </summary>
        public void PrintData()
        {
            try
            {
                if (!IsDispose)
                {
                   StreamObj=System.IO.File.OpenRead(AppDomain.CurrentDomain.BaseDirectory+"\\TextFile.txt");
                   System.Console.WriteLine("File Length\t:\t"+StreamObj.Length.ToString());        
                }
            }
            catch (Exception ex)
            {
                throw new Exception(ex.Message);
            }
        }

        #endregion

        #region Destructor

        /// <summary>
        /// This destructor will run only if the Dispose method
        /// does not get called.
        /// It gives your base class the opportunity to finalize.
        /// Do not provide destructors in types derived from this class.
        /// </summary>
        ~DisposeDemo()
        {
            // Do not re-create Dispose clean-up code here.
            // Calling Dispose(false) is optimal in terms of
            // readability and maintainability.

            Dispose(false);   
        }

        #endregion
    }

Step 3
Add the following code in program class.Note that the eight line of code causes an exception as we are trying to access a member after the object was disposed.it is look like this

static void Main(string[] args)
        {
            try
            {
                DisposeDemo DD = new DisposeDemo(); // create a instance of class
                
                DD.PrintData(); // print the data
 
                DD.Dispose(); // Dispose the object

                DD.PrintData(); // throw ObjectDisposedException
  
            }
            catch (Exception ex)
            {
                System.Console.WriteLine(ex.Message);     
            }
        }

Full Code

using System;
using System.Collections.Generic;
using System.Linq;
using System.Text;
using System.IO;


namespace ConIDisposable
{
    class Program
    {
        static void Main(string[] args)
        {
            try
            {
                DisposeDemo DD = new DisposeDemo(); // create a instance of class
                
                DD.PrintData(); // print the data
 
                DD.Dispose(); // Dispose the object

                DD.PrintData(); // throw ObjectDisposedException
  
            }
            catch (Exception ex)
            {
                System.Console.WriteLine(ex.Message);     
            }
        }
    }

    public class DisposeDemo : IDisposable
    {
        #region Declaration

        private Boolean IsDisposed = false;
        private Stream StreamObj = null;

        #endregion

        #region Dispose Method
        /// <summary>
        /// All managed and unmanaged resources can be released
        /// 
        /// If disposing equals true, the method has been called directly
        /// or indirectly by a user's code. Managed and unmanaged resources
        /// can be disposed.

        /// If disposing equals false, the method has been called by the
        /// runtime from inside the finalizer and you should not reference
        /// other objects. Only unmanaged resources can be disposed.

        /// </summary>
        /// <param name="Disposing"></param>
        private void Dispose(Boolean Disposing)
        {
            try
            {
                if (this.IsDisposed == false)
                {
                    if (Disposing == true)
                    {
                        StreamObj.Dispose();  
                    }
                    StreamObj = null; 
                }
                this.IsDisposed = true;
            }
            catch (Exception ex)
            {
                throw new Exception(ex.Message);
            }
        }

        #endregion

        #region IDisposable Member

        /// <summary>
        /// Used to clean up and free unmanaged resources.
        /// </summary>
        public void Dispose()
        {
            try
            {
                Dispose(true);

                // Request that the system not call the finalizer for specified object.
                System.GC.SuppressFinalize(this);
            }
            catch (Exception ex)
            {
                throw new Exception(ex.Message);
            }
        }

        #endregion

        #region Property
        /// <summary>
        /// When the object is disposed then it will throw ObjectDisposedException
        /// it is an optional property.
        /// </summary>
        private  Boolean IsDispose
        {
            get
            {
                Boolean Flag = false;
                try
                {
                    if (IsDisposed == true)
                    {
                        Flag = true;
                        throw new ObjectDisposedException(this.GetType().FullName);
                    }
                }
                catch (Exception ex)
                {
                    throw new Exception(ex.Message);
                }
                return Flag;
            }
        }
       
       
        #endregion

        #region Print Data
        /// <summary>
        /// It will first check the object is disposed or not if object is not dispose then it will print data otherwise it will throw exception.
        /// </summary>
        public void PrintData()
        {
            try
            {
                if (!IsDispose)
                {
                   StreamObj=System.IO.File.OpenRead(AppDomain.CurrentDomain.BaseDirectory+"\\TextFile.txt");
                   System.Console.WriteLine("File Length\t:\t"+StreamObj.Length.ToString());        
                }
            }
            catch (Exception ex)
            {
                throw new Exception(ex.Message);
            }
        }

        #endregion

        #region Destructor

        /// <summary>
        /// This destructor will run only if the Dispose method
        /// does not get called.
        /// It gives your base class the opportunity to finalize.
        /// Do not provide destructors in types derived from this class.
        /// </summary>
        ~DisposeDemo()
        {
            // Do not re-create Dispose clean-up code here.
            // Calling Dispose(false) is optimal in terms of
            // readability and maintainability.

            Dispose(false);   
        }

        #endregion
    }

   
}
Run the project.

Download

Wednesday, October 6, 2010

WPF - Find a Control from DataTemplate in WPF

In this article i will show you how to find control from datatemplate in WPF.


In this example I will bind tables name from northwind database into a listbox and get an only those tables name which user will selected on listbox.


Step 1
Create a WPF Application.


Step 2
Add a listbox and button on window,it is look like this


<Grid>
        <ListBox Height="181" HorizontalAlignment="Left" Margin="179,12,0,0" Name="listBox1" VerticalAlignment="Top" Width="159"/>
        <Button x:Name="btnOk" Height="23" Width="80" Margin="219,210,204,78" Content="OK" Click="btnOk_Click"></Button>
    </Grid>

Step 3
Create datatemplate for listbox,it is look like this
<Window.Resources>
        
        <DataTemplate x:Key="CheckListBox">
            <StackPanel Orientation="Horizontal">
                
                <CheckBox Name="ChkList" IsChecked="True" Content="{Binding Path=name}"></CheckBox>
               
            </StackPanel>
        </DataTemplate>
    </Window.Resources>  

Data Template are a similar concept as Control Template. They give you a very flexible and powerful solution to replace the visual appearance of a data item in a control like ListBox, ComboBox or ListView.

Content Property -  Bind the tables name in checkbox.Display tables name in checkbox.
Binding Path=name - name is represent the tables name of northwind database.it is column name of sys.tables
IsChecked Property - Gets or sets whether the checkbox is checked.


Step 4
Apply a datatemplate on listbox,it is look like this

<ListBox Height="181" HorizontalAlignment="Left" Margin="179,12,0,0" Name="listBox1" VerticalAlignment="Top" Width="159" 

ItemTemplate="{StaticResource 
CheckListBox}" ItemsSource="{Binding}" />


ItemTemplate Property - Gets or sets the datatemplate used to display each item.

ItemSource Property- Gets or sets a collection used to generate the content of the itemsControl.


Step 5
Get tables name from northwind database.write a GetTableName method in code behind,it is look like this
/// <summary>
        /// Get table name from nortwind databases
        /// </summary>
        /// <returns>DataTable</returns>
        private DataTable GetTableName()
        {
            try
            {
                SqlConnection SqlCon = new SqlConnection();
                SqlCon.ConnectionString = @"Data Source=shree\shree;Initial Catalog=Northwind;Integrated Security=True";
                SqlCon.Open();

                SqlCommand SqlComm = new SqlCommand("SELECT [name] FROM sys.tables");
                SqlComm.Connection = SqlCon;

                DataTable Table = new DataTable();
                SqlDataAdapter SqlDa = new SqlDataAdapter();
                SqlDa.SelectCommand = SqlComm;
                SqlDa.Fill(Table);

                return Table; 
            }
            catch (Exception ex)
            {
                throw new Exception(ex.Message);  
            }
        }

Bind the tables name in listbox.
private void Window_Loaded(object sender, RoutedEventArgs e)
        {
            try
            {
                listBox1.DataContext = GetTableName(); // Bind Tables Name in ListBox
            }
            catch (Exception ex)
            {
                throw new Exception(ex.Message);
            }
        }

Step 6
Find child control from ContentPresenter.it is look like this
 /// <summary>
        /// Find Child Control from ContentPresenter
        /// </summary>
        /// <typeparam name="ChildControl"></typeparam>
        /// <param name="DependencyObj"></param>
        /// <returns></returns>
        private ChildControl FindVisualChild<ChildControl>(DependencyObject DependencyObj)
        where ChildControl : DependencyObject
        {
            for (int i = 0; i < VisualTreeHelper.GetChildrenCount(DependencyObj); i++)
            {
                DependencyObject Child = VisualTreeHelper.GetChild(DependencyObj, i);

                if (Child != null && Child is ChildControl)
                {
                    return (ChildControl)Child;
                }
                else
                {
                    ChildControl ChildOfChild = FindVisualChild<ChildControl>(Child);

                    if (ChildOfChild != null)
                    {
                        return ChildOfChild;
                    }
                }
            }
            return null;
        }

Step 7
Get a selected checkbox items from listbox,it is look like this

/// <summary>
        /// Get a selected checkbox items
        /// </summary>
        private void GetSelectedCheckObjItem()
        {
            try
            {
                for (int i = 0; i < listBox1.Items.Count; i++)
                {
                    // Get a all list items from listbox
                    ListBoxItem ListBoxItemObj = (ListBoxItem)listBox1.ItemContainerGenerator.ContainerFromItem(listBox1.Items[i]);

                    // find a ContentPresenter of that list item.. [Call FindVisualChild Method]
                    ContentPresenter ContentPresenterObj = FindVisualChild<ContentPresenter>(ListBoxItemObj);

                    // call FindName on the DataTemplate of that ContentPresenter
                    DataTemplate DataTemplateObj = ContentPresenterObj.ContentTemplate;
                    CheckBox Chk = (CheckBox)DataTemplateObj.FindName("ChkList", ContentPresenterObj);

                    // get a selected checkbox items.
                    if (Chk.IsChecked == true)
                    {
                        MessageBox.Show(Chk.Content.ToString().Trim()); 
                    }
                }
            }
            catch (Exception ex)
            {
                throw new Exception(ex.Message);  
            }
        }

Call GetSelectedCheckObjItem method on button click event.
private void btnOk_Click(object sender, RoutedEventArgs e)
        {
            try
            {
                GetSelectedCheckObjItem(); // Get a selected checkbox items
            }
            catch (Exception ex)
            {
                MessageBox.Show(ex.Message);   
            }
        }

Full Code

1. XAML Code

<Window x:Class="WPF_CheckListBox.MainWindow"
        xmlns="http://schemas.microsoft.com/winfx/2006/xaml/presentation"
        xmlns:x="http://schemas.microsoft.com/winfx/2006/xaml"
        Title="MainWindow" Height="350" Width="525" Loaded="Window_Loaded">
    
    <Window.Resources>
        
        <DataTemplate x:Key="CheckListBox">
            <StackPanel Orientation="Horizontal">
                
                <CheckBox Name="ChkList" IsChecked="True" Content="{Binding Path=name}"></CheckBox>
               
            </StackPanel>
        </DataTemplate>
    </Window.Resources>  
    
    <Grid>
        <ListBox Height="181" HorizontalAlignment="Left" Margin="179,12,0,0" Name="listBox1" VerticalAlignment="Top" Width="159" ItemTemplate="{StaticResource CheckListBox}" ItemsSource="{Binding}" />
        <Button x:Name="btnOk" Height="23" Width="80" Margin="219,210,204,78" Content="OK" Click="btnOk_Click"></Button>
    </Grid>
</Window>

2. Code Behind

using System;
using System.Collections.Generic;
using System.Linq;
using System.Text;
using System.Windows;
using System.Windows.Controls;
using System.Windows.Data;
using System.Windows.Documents;
using System.Windows.Input;
using System.Windows.Media;
using System.Windows.Media.Imaging;
using System.Windows.Navigation;
using System.Windows.Shapes;
using System.Data;
using System.Data.SqlClient;   

namespace WPF_CheckListBox
{
    /// <summary>
    /// Interaction logic for MainWindow.xaml
    /// </summary>
    public partial class MainWindow : Window
    {
        public MainWindow()
        {
            InitializeComponent();
        }

        private void Window_Loaded(object sender, RoutedEventArgs e)
        {
            try
            {
                listBox1.DataContext = GetTableName(); // Bind Tables Name in ListBox
            }
            catch (Exception ex)
            {
                throw new Exception(ex.Message);
            }
        }

        private void btnOk_Click(object sender, RoutedEventArgs e)
        {
            try
            {
                GetSelectedCheckObjItem(); // Get a selected checkbox items
            }
            catch (Exception ex)
            {
                MessageBox.Show(ex.Message);   
            }
        }

        #region Methods
        /// <summary>
        /// Get table name from nortwind databases
        /// </summary>
        /// <returns>DataTable</returns>
        private DataTable GetTableName()
        {
            try
            {
                SqlConnection SqlCon = new SqlConnection();
                SqlCon.ConnectionString = @"Data Source=shree\shree;Initial Catalog=Northwind;Integrated Security=True";
                SqlCon.Open();

                SqlCommand SqlComm = new SqlCommand("SELECT [name] FROM sys.tables");
                SqlComm.Connection = SqlCon;

                DataTable Table = new DataTable();
                SqlDataAdapter SqlDa = new SqlDataAdapter();
                SqlDa.SelectCommand = SqlComm;
                SqlDa.Fill(Table);

                return Table; 
            }
            catch (Exception ex)
            {
                throw new Exception(ex.Message);  
            }
        }

        /// <summary>
        /// Find Child Control from ContentPresenter
        /// </summary>
        /// <typeparam name="ChildControl"></typeparam>
        /// <param name="DependencyObj"></param>
        /// <returns></returns>
        private ChildControl FindVisualChild<ChildControl>(DependencyObject DependencyObj)
        where ChildControl : DependencyObject
        {
            for (int i = 0; i < VisualTreeHelper.GetChildrenCount(DependencyObj); i++)
            {
                DependencyObject Child = VisualTreeHelper.GetChild(DependencyObj, i);

                if (Child != null && Child is ChildControl)
                {
                    return (ChildControl)Child;
                }
                else
                {
                    ChildControl ChildOfChild = FindVisualChild<ChildControl>(Child);

                    if (ChildOfChild != null)
                    {
                        return ChildOfChild;
                    }
                }
            }
            return null;
        }

        /// <summary>
        /// Get a selected checkbox items
        /// </summary>
        private void GetSelectedCheckObjItem()
        {
            try
            {
                for (int i = 0; i < listBox1.Items.Count; i++)
                {
                    // Get a all list items from listbox
                    ListBoxItem ListBoxItemObj = (ListBoxItem)listBox1.ItemContainerGenerator.ContainerFromItem(listBox1.Items[i]);

                    // find a ContentPresenter of that list item.. [Call FindVisualChild Method]
                    ContentPresenter ContentPresenterObj = FindVisualChild<ContentPresenter>(ListBoxItemObj);

                    // call FindName on the DataTemplate of that ContentPresenter
                    DataTemplate DataTemplateObj = ContentPresenterObj.ContentTemplate;
                    CheckBox Chk = (CheckBox)DataTemplateObj.FindName("ChkList", ContentPresenterObj);

                    // get a selected checkbox items.
                    if (Chk.IsChecked == true)
                    {
                        MessageBox.Show(Chk.Content.ToString().Trim()); 
                    }
                }
            }
            catch (Exception ex)
            {
                throw new Exception(ex.Message);  
            }
        }

        #endregion
    }
}


Download
Download Source Code