Step 1
Create a student table in database,it is look like this

Step 2
Create a Insert,Update and Delete Stored procedure in Database, it is look like this
Insert
CREATE PROCEDURE dbo.InsertStudent
(
    @FirstName nvarchar(50),
    @LastName nvarchar(50),

    @Status nvarchar(100) OUTPUT
)
AS

    BEGIN

        BEGIN TRY

            INSERT INTO Student
            (FirstName,LastName)
            VALUES
            (@FirstName,@LastName)

            SET @Status='Data Insert Sucessfully'

        END TRY

        BEGIN CATCH
            SET @Status='Data Insert UnSucessfully'
        END CATCH

    END

GO
Update
CREATE PROCEDURE dbo.UpdateStudent
(
    @StudentID Numeric(18,0),
    @FirstName nvarchar(50),
    @LastName nvarchar(50),

    @Status nvarchar(100) OUTPUT
)
AS

        BEGIN

            BEGIN TRY

                UPDATE Student
                    SET FirstName=@FirstName,
                          LastName=@LastName

                        WHERE StudentID=@StudentID;


                SET @Status='Data Update Sucessfully'


            END TRY

            BEGIN CATCH

                SET @Status='Data Update UnSucessfully'

            END CATCH

        END

GO
Delete
CREATE PROCEDURE dbo.DeleteStudent
(

    @StudentID Numeric(18,0),

    @Status nvarchar(100) OUTPUT

)
AS

    BEGIN

        BEGIN TRY

            DELETE Student
                WHERE Student.StudentID=@StudentID

                SET @Status='Data Delete Sucessfully'

        END TRY
        BEGIN CATCH
                SET @Status='Data Delete UnSucessfully'
        END CATCH

    END

GO
Step 3
Create a console application and give the solution name as ConLinqToSql_StoredProc.
Step 4
Add a ConnectionString in app.config file,it is look like this
Create a console application and give the solution name as ConLinqToSql_StoredProc.
Step 4
Add a ConnectionString in app.config file,it is look like this
<connectionStrings>
        <add name="ConStr"
            connectionString="Data Source=SHREE\SHREE;Initial Catalog=ABC;Integrated Security=True"
            providerName="System.Data.SqlClient" />
    </connectionStrings>
Step 5
Create a new folder inside the solution and give the folder name as ORD,it is look like this

Step 6
Create a Student Model Class inside the ORD folder,it is look like this
 public class StudentModel
    {
        #region Property

        public long StudnetID
        {
            get;
            set;
        }

        public String FirstName
        {
            get;
            set;
        }

        public String LastName
        {
            get;
            set;
        }

        #endregion
    }
Step 7

Click on image for better view
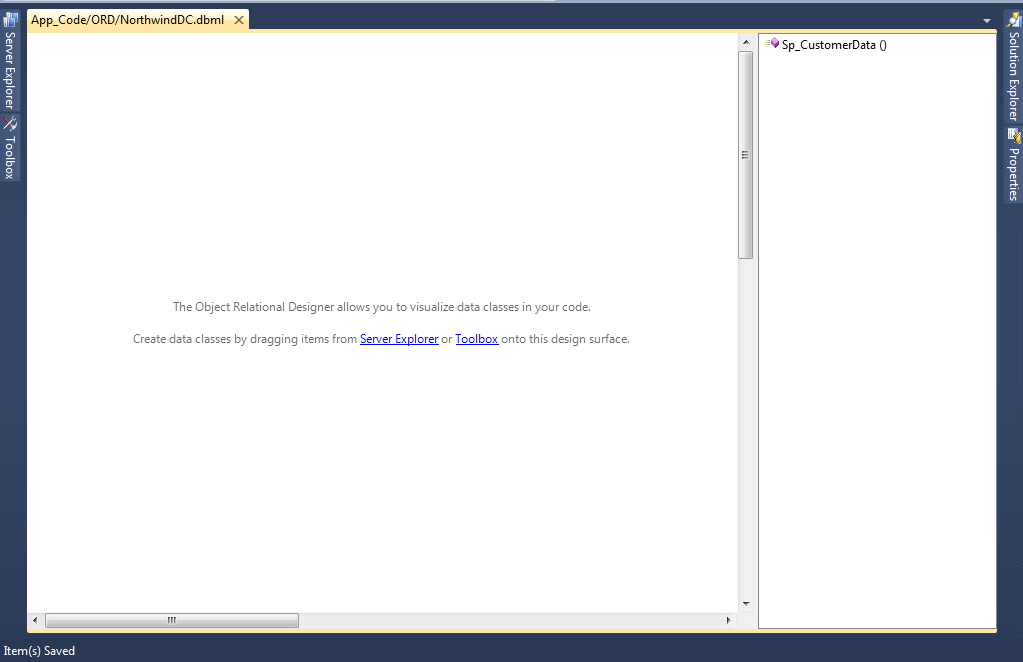
Step 8
Open a O/R Designer by double click on StudentDC.dbml,it is look like this

Click on image for better view

Click on image for better view
Visual stdio provides an object-relational mapping designer,called the O/R Designer which allows you to visually design the object to database mapping.
Step 9
To map stored procedure in DataContext class.go to the server explorer,select a database,go to the Stored Procedure and select InsertStudent,UpdateStudent and DeleteStudent stored procedures ,it is look like this

Click on image for better view
Drag and drop all three stored procedures from Server explorer onto the design surface of the O/R Designer,it is look like this

Click on image for better view
Step 10
Create a Student static class in a ORD folder for insert,update and delete data to database,it is look like this
using System;
using System.Collections.Generic;
using System.Linq;
using System.Text;

namespace ConLinqToSql_StoredProc.ORD
{
    public static class Student
    {
        #region Methods

        /// <summary>
        /// Insert Student Data
        /// </summary>
        /// <param name="StudentObj">Specify the Student Object</param>
        /// <returns>String</returns>
        public static String InsertStudent(ORD.StudentModel StudentObj)
        {
            String Status = String.Empty;
            try
            {
                // Create a Student DataContext Object and specify the connectionstring in datacontext constructor.
                ORD.StudentDC DC = new StudentDC(System.Configuration.ConfigurationManager.ConnectionStrings["ConStr"].ConnectionString.Trim());

                // Call maped Insert Stored Procedure
                DC.InsertStudent(StudentObj.FirstName, StudentObj.LastName, ref Status);

                return Status;

            }
            catch (Exception ex)
            {
                throw new Exception(ex.Message);
            }
        }

        /// <summary>
        /// Update Student Data
        /// </summary>
        /// <param name="StudentObj">Specify the Student Object</param>
        /// <returns>String</returns>
        public static String UpdateStudent(ORD.StudentModel StudentObj)
        {
            String Status = String.Empty;

            try
            {
                // Create a Student DataContext Object and specify the connectionstring in datacontext constructor.
                ORD.StudentDC DC = new StudentDC(System.Configuration.ConfigurationManager.ConnectionStrings["ConStr"].ConnectionString.Trim());

                // Call maped Update Stored Procedure
                DC.UpdateStudent(StudentObj.StudnetID, StudentObj.FirstName, StudentObj.LastName, ref Status);

                return Status;
            }
            catch (Exception ex)
            {
                throw new Exception(ex.Message);
            }
        }

        /// <summary>
        ///  Delete Student Data
        /// </summary>
        /// <param name="StudentObj">Specify the Student Object</param>
        /// <returns>String</returns>
        public static String DeleteStudent(ORD.StudentModel StudentObj)
        {
            String Status = String.Empty;

            try
            {
                // Create a Student DataContext Object and specify the connectionstring in datacontext constructor.
                ORD.StudentDC DC = new StudentDC(System.Configuration.ConfigurationManager.ConnectionStrings["ConStr"].ConnectionString.Trim());

                // Call maped Delete Stored Procedure
                DC.DeleteStudent(StudentObj.StudnetID, ref Status);

                return Status;
            }
            catch (Exception ex)
            {
                throw new Exception(ex.Message);
            }
        }


        #endregion
    }
}
Step 11
Call a methods in Main function,it is look like this
using System;
using System.Collections.Generic;
using System.Linq;
using System.Text;

namespace ConLinqToSql_StoredProc
{
    class Program
    {
        static void Main(string[] args)
        {
            try
            {
                // Create a Object of StudentModel Class
                ORD.StudentModel StudentModelObj = new ORD.StudentModel();


                //#region Insert Section


                //StudentModelObj.FirstName = "Kishor";
                //StudentModelObj.LastName = "Naik";

                //System.Console.WriteLine(ORD.Student.InsertStudent(StudentModelObj));

                //#endregion


                #region Update Section

                //StudentModelObj.StudnetID = 1;
                //StudentModelObj.FirstName = "Yogesh";
                //StudentModelObj.LastName = "Naik";

                //System.Console.WriteLine(ORD.Student.UpdateStudent(StudentModelObj));

                #endregion


                #region Delete Section

                StudentModelObj.StudnetID = 1;

                System.Console.WriteLine(ORD.Student.DeleteStudent(StudentModelObj));

                #endregion


            }
            catch (Exception ex)
            {
                throw new Exception(ex.Message);
            }
        }
    }
}
Run the Project.
Download
Download Source Code