Sunday, May 20, 2012

WPF - TreeView Databinding in WPF

In this article i will show how to data bind in TreeView Control In WPF.


Step 1
Download Northwind database from the following link.
http://www.microsoft.com/downloads/details.aspx?FamilyID=06616212-0356-46a0-8da2-eebc53a68034&displaylang=en


Step 2
Attach a Northwind database into MS-SQL server.


Step 3
Create a WPF Application and give the solution name as SolWPFTreeView.


Step 4
Now we have to define Parent and child relationship between Categories and Products Tables from Northwind database by using DataRelation Class,create Northwind Static Class,it is look like this


using System;
using System.Collections.Generic;
using System.Linq;
using System.Text;
using System.Data;
using System.Data.SqlClient;

namespace SolWPFTreeView
{
    public static class Northwind
    {
        #region 

        /// <summary>
        /// Data Relation Between Two Tables Such as Categories and Products
        /// </summary>
        /// <returns>DataSet</returns>
        public static DataSet CreateDataRelation()
        {
            try
            {
                SqlConnection SqlCon = new SqlConnection();
                SqlCon.ConnectionString = @"Data Source=SHREE_DESKTOP\SHREE;Initial Catalog=Northwind;Integrated Security=True";
                SqlCon.Open();

                SqlDataAdapter SqlCategoryDa = new SqlDataAdapter("SELECT CategoryID,CategoryName FROM Categories", SqlCon);

                SqlDataAdapter SqlProductDa = new SqlDataAdapter("SELECT CategoryID,ProductID,ProductName,UnitPrice FROM Products", SqlCon);

                DataSet Ds = new DataSet();
                SqlCategoryDa.Fill(Ds, "Categories");
                SqlProductDa.Fill(Ds, "Products");


                DataRelation Dr = new DataRelation("DataRelationShip",
                    Ds.Tables["Categories"].Columns["CategoryID"],
                    Ds.Tables["Products"].Columns["CategoryID"],
                    true
                    );
                Dr.Nested = true;

                Ds.Relations.Add(Dr);

                return Ds;
            }
            catch (Exception ex)
            {
                throw new Exception(ex.Message);
            }
        }

        #endregion
    }
}

Step 5
Add a Treeview control in window,it is look like this
<Grid>

        <TreeView x:Name="ProductTreeView" HorizontalContentAlignment="Stretch" VerticalContentAlignment="Stretch">
            <TreeView.Background>
                <LinearGradientBrush EndPoint="0.5,1" StartPoint="0.5,0">
                    <GradientStop Color="#FF062F3B" Offset="0" />
                    <GradientStop Color="#FF77A7BE" Offset="1" />
                </LinearGradientBrush>
            </TreeView.Background>
        </TreeView>
    </Grid>

Step 6
Create a Templates for Nodes,For displaying data in nodes first we have to create a DataTemplate for Product later we have to create HierarchicalDataTemplate for Categories  and then we can add it to this template and bind accordingly. Remember to provide a unique Key for the template. Then we can use this key for referring it in ItemTemplate of the HierarchicalDataTemplate,it is look like this
<Window.Resources>
  <DataTemplate x:Key="ProductDataTemplate">

            <Border BorderThickness="2" CornerRadius="10" Background="Gray" Width="310">
   
   <Grid Width="300" Height="20">
    <Grid.ColumnDefinitions>
     <ColumnDefinition Width="0.771*"/>
     <ColumnDefinition Width="0.229*"/>
    </Grid.ColumnDefinitions>
    <Grid.RowDefinitions>
     <RowDefinition Height="0.5*"/>
    </Grid.RowDefinitions>
    
    <TextBlock Grid.Row="0" Grid.Column="0"  Text="{Binding ProductName}" Margin="10,0" Foreground="WhiteSmoke"></TextBlock>
                <TextBlock Grid.Row="0" Grid.Column="1" Text="{Binding UnitPrice}" Margin="10,0" Foreground="WhiteSmoke"></TextBlock>
    
   </Grid>
   </Border>
  </DataTemplate>
  
  
  <HierarchicalDataTemplate x:Key="CategoryDataTemplate" 
       ItemsSource="{Binding DataRelationShip}" 
       ItemTemplate="{StaticResource ProductDataTemplate}">
   <Border BorderThickness="2" CornerRadius="10" Background="Orange" Width="340">
    <Grid Height="20">
     <TextBlock Text="{Binding CategoryName}" Margin="10,0" HorizontalAlignment="Stretch" VerticalAlignment="Center"></TextBlock>
    </Grid>
   </Border>
   
  </HierarchicalDataTemplate>
  
  
 </Window.Resources>


Step 7
Apply ItemTemplate on treeview control,in ItemSource we need specify parent table name  in our case it is Categories Table.it is look like this
<Grid>

        <TreeView x:Name="ProductTreeView"   ItemsSource="{Binding Categories}" ItemTemplate="{DynamicResource CategoryDataTemplate}" HorizontalContentAlignment="Stretch" VerticalContentAlignment="Stretch">
            <TreeView.Background>
                <LinearGradientBrush EndPoint="0.5,1" StartPoint="0.5,0">
                    <GradientStop Color="#FF062F3B" Offset="0" />
                    <GradientStop Color="#FF77A7BE" Offset="1" />
                </LinearGradientBrush>
            </TreeView.Background>
        </TreeView>
    </Grid>

Step 8
Bind the data in TreeView Control in Code Behind,it is look like this
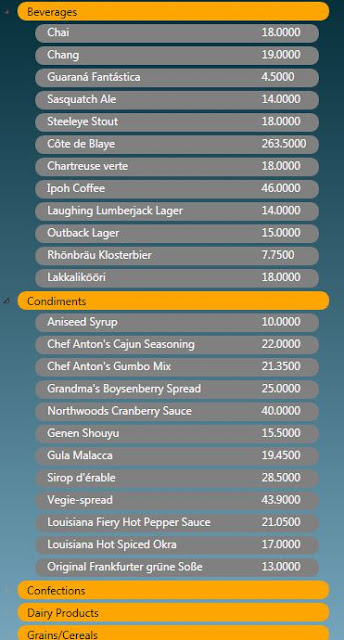
using System;
using System.Collections.Generic;
using System.Linq;
using System.Text;
using System.Windows;
using System.Windows.Controls;
using System.Windows.Data;
using System.Windows.Documents;
using System.Windows.Input;
using System.Windows.Media;
using System.Windows.Media.Imaging;
using System.Windows.Navigation;
using System.Windows.Shapes;

namespace SolWPFTreeView
{
    /// <summary>
    /// Interaction logic for MainWindow.xaml
    /// </summary>
    public partial class MainWindow : Window
    {
        public MainWindow()
        {
            InitializeComponent();

            try
            {
                // Bind The RelationShip Data
                this.ProductTreeView.DataContext = Northwind.CreateDataRelation();
            }
            catch (Exception ex)
            {
                MessageBox.Show(ex.Message); 
            }
        }
    }
}

Run the Project.


Output


Click on Image for better View


Click on Image for better View


Full XAML Code
<Window x:Class="SolWPFTreeView.MainWindow"
  xmlns="http://schemas.microsoft.com/winfx/2006/xaml/presentation"
  xmlns:x="http://schemas.microsoft.com/winfx/2006/xaml"
  Title="MainWindow" Height="350" Width="525">
 <Window.Resources>
  <DataTemplate x:Key="ProductDataTemplate">

            <Border BorderThickness="2" CornerRadius="10" Background="Gray" Width="310">
   
   <Grid Width="300" Height="20">
    <Grid.ColumnDefinitions>
     <ColumnDefinition Width="0.771*"/>
     <ColumnDefinition Width="0.229*"/>
    </Grid.ColumnDefinitions>
    <Grid.RowDefinitions>
     <RowDefinition Height="0.5*"/>
    </Grid.RowDefinitions>
    
    <TextBlock Grid.Row="0" Grid.Column="0"  Text="{Binding ProductName}" Margin="10,0" Foreground="WhiteSmoke"></TextBlock>
                <TextBlock Grid.Row="0" Grid.Column="1" Text="{Binding UnitPrice}" Margin="10,0" Foreground="WhiteSmoke"></TextBlock>
    
   </Grid>
   </Border>
  </DataTemplate>
  
  
  <HierarchicalDataTemplate x:Key="CategoryDataTemplate" 
       ItemsSource="{Binding DataRelationShip}" 
       ItemTemplate="{StaticResource ProductDataTemplate}">
   <Border BorderThickness="2" CornerRadius="10" Background="Orange" Width="340">
    <Grid Height="20">
     <TextBlock Text="{Binding CategoryName}" Margin="10,0" HorizontalAlignment="Stretch" VerticalAlignment="Center"></TextBlock>
    </Grid>
   </Border>
   
  </HierarchicalDataTemplate>
  
  
 </Window.Resources>
 <Grid>

        <TreeView x:Name="ProductTreeView"   ItemsSource="{Binding Categories}" ItemTemplate="{DynamicResource CategoryDataTemplate}" HorizontalContentAlignment="Stretch" VerticalContentAlignment="Stretch">
            <TreeView.Background>
                <LinearGradientBrush EndPoint="0.5,1" StartPoint="0.5,0">
                    <GradientStop Color="#FF062F3B" Offset="0" />
                    <GradientStop Color="#FF77A7BE" Offset="1" />
                </LinearGradientBrush>
            </TreeView.Background>
        </TreeView>
    </Grid>
</Window>

Download
Download Source Code

Monday, May 14, 2012

AJAX - Twitter Control

The Twitter control is an ASP.NET AJAX control that enables you to display Twitter status messages (tweets) from Twitter.com. This control has two modes: Profile and Search. In Profile mode, you can display the tweets from a particular user by supplying the user's Twitter screen name. In Search mode, you can display all tweets which match a search query.

We can display recent tweets by using Timer Control and AsyncPostBackTrigger.

Lets see how to use twitter control in asp.net.

Step 1
First you need to download latest AJAX control toolkit(May 2012 Release) from the following Link.

Step 2
Create a web application and give solution name as SolTwitter.

Step 3
Add Ajax control toolkit on Toolbox tab.

Step 4
Add a ToolkitScriptManager control from Ajax toolkit inside the Div Tag,it is look like this

<asp:ToolkitScriptManager ID="ToolkitScriptManager1" runat="server">
</asp:ToolkitScriptManager>

This control allows you to replace the default <asp:scriptmanager> control behavior, and supports the ability to dynamically merge multiple client-side Javascript scripts into a single file that is downloaded to the client at runtime. 

Step 5
Drag and drop an Update Panel on the page.it's look like this 
<asp:UpdatePanel ID="UpdatePanel1" runat="server" UpdateMode="Always" >
     <ContentTemplate>
     </ContentTemplate>
</asp:UpdatePanel>


Step 6
Drag and Drop two twitter control on page inside the Updatepanel content template.Twitter Control has 2 modes: Profile and Search. By setting this property we can display tweets accordingly.in first twitter control we have to set profile mode property and another one we have to set Search mode property,it is look like this 
<table border="0" cellpadding="2" cellspacing="2" width="70%" align="center">
                                <tr>
                                    <td><h2>Profile</h2></td>
                                    <td><h2>Search</h2></td>
                                </tr>
                                <tr>
                                    <td>
                                        <asp:Twitter ID="TwitterProfile" runat="server" Mode="Profile"  
                                            ScreenName="billgates" IsLiveContentOnDesignMode="True" Count="5">
                                        </asp:Twitter>
                                    </td>
                
                                    <td>
                                        <asp:Twitter ID="TwitterSearch" runat="server" Mode="Search" 
                                            Search="JQuery" Caption="JQuery" Title="JQuery" 
                                            IsLiveContentOnDesignMode="True" Count="5" CacheDuration="1">
                                        </asp:Twitter>
                                    </td>
                                </tr>
                                <tr>
                                    <td colspan="2" align="center">
                                        <asp:Label ID="lblTime" runat="server"></asp:Label>
                                    </td>
                                </tr>

                                 
                            </table>


Twitter Properties

  • Mode - either Profile or Search mode.
  • ScreenName - required in Profile mode. The Twitter user to display.
  • Search - required in Search mode. The search to perform. You can build complex queries with search operators
  • Count - number of status messages (tweets) to display. The default value is 5.
  • CacheDuration - amount of time to cache results from Twitter in seconds. The default value is 300 seconds.Twitter limits the number of times that you can interact with their API in an hour.the Twitter control caches results on the server a duration of 5 minutes. You can modify the cache duration by assigning a value (in seconds) to the Twitter control's CacheDuration property.
  • Title - enables you to display title text in the header. In Profile mode, the default value is the full user name.
  • Caption - enables you to display caption text in the header. In Profile mode, the default value is the user screen name.


Step 7
Now use timer control to refresh whole page at certain intervals with each postback.Only the contents of the UpdatePanel control will be updated.Add a timer control below the toolscriptmanager and set timer interval as 1. 


<asp:Timer ID="TimerTweet" runat="server" Interval="1" ontick="TimerTweet_Tick">
</asp:Timer>

Step 8
Add AsyncPostBackTrigger in Update Panel Control to invoke timer control,it is look like this
<Triggers>
                        <asp:AsyncPostBackTrigger ControlID="TimerTweet" EventName="Tick" />
                    </Triggers>

Step 9
Add a below code in Timer_Tick Event,it display current time on page,it is look like this


protected void TimerTweet_Tick(object sender, EventArgs e)
    {
        try
        {
            lblTime.Text = DateTime.Now.ToLongTimeString();
        }
        catch (Exception)
        {
            
        }
    }


Full .Aspx Code
<%@ Page Language="C#" AutoEventWireup="true"  CodeFile="Default.aspx.cs" Inherits="_Default" %>

<%@ Register Assembly="AjaxControlToolkit" Namespace="AjaxControlToolkit" TagPrefix="asp" %>

<!DOCTYPE html PUBLIC "-//W3C//DTD XHTML 1.0 Transitional//EN" "http://www.w3.org/TR/xhtml1/DTD/xhtml1-transitional.dtd">

<html xmlns="http://www.w3.org/1999/xhtml">
<head runat="server">
    <title></title>
</head>
<body>
    <form id="form1" runat="server">
    <div>

        <asp:ToolkitScriptManager ID="ToolkitScriptManager1" runat="server">
        </asp:ToolkitScriptManager>

        <asp:Timer ID="TimerTweet" runat="server" Interval="1" ontick="TimerTweet_Tick">
        </asp:Timer>


                <asp:UpdatePanel ID="UpdatePanel1" runat="server" UpdateMode="Always" >
                    <ContentTemplate>
                          <table border="0" cellpadding="2" cellspacing="2" width="70%" align="center">
                                <tr>
                                    <td><h2>Profile</h2></td>
                                    <td><h2>Search</h2></td>
                                </tr>
                                <tr>
                                    <td>
                                        <asp:Twitter ID="TwitterProfile" runat="server" Mode="Profile"  
                                            ScreenName="billgates" IsLiveContentOnDesignMode="True" Count="5">
                                        </asp:Twitter>
                                    </td>
                
                                    <td>
                                        <asp:Twitter ID="TwitterSearch" runat="server" Mode="Search" 
                                            Search="JQuery" Caption="JQuery" Title="JQuery" 
                                            IsLiveContentOnDesignMode="True" Count="5" CacheDuration="1">
                                        </asp:Twitter>
                                    </td>
                                </tr>
                                <tr>
                                    <td colspan="2" align="center">
                                        <asp:Label ID="lblTime" runat="server"></asp:Label>
                                    </td>
                                </tr>

                                 
                            </table>

                    </ContentTemplate>

                    <Triggers>
                        <asp:AsyncPostBackTrigger ControlID="TimerTweet" EventName="Tick" />
                    </Triggers>
                   
                </asp:UpdatePanel>


    </div>
    </form>
</body>
</html>


Output


Download
Download Source Code

Tuesday, May 8, 2012

C#.net - Read Text from Image in C#.net

In this article i will show you how to read text from image by using OCR Components in C#.net.


What is OCR?
OCR (Optical Character Recognition) is the recognition of printed or written text characters by a computer. This involves photoscanning of the text character-by-character, analysis of the scanned-in image, and then translation of the character image into character codes, such as ASCII, commonly used in data processing.


OCR translates images of text, such as scanned documents, into actual text characters. Also known as text recognition, OCR makes it possible to edit and reuse the text that is normally locked inside scanned images. OCR works using a form of artificial intelligence known as pattern recognition, to identify individual text characters on a page, including punctuation marks, spaces, and ends of lines.


First off, you need to have MS Office 2007 installed or later version. This is obviously a dependency if you develop an application to use the OCR capabilites in the field – it won’t work without Office installed. Furthermore, the OCR capability doesn’t install by default when you install Office, you need to add a component called ‘Microsoft Office Document Imaging’ (MODI).


Instructions on how to add the required MODI component.


Step 1
Click Start, click Run, type appwiz.cpl in the Open box, and then click OK.


Step 2
Click to select the Office 2007 version that you have installed.


Step 3
Click Change.


Step 4
Click Add or Remove Features, and then click Continue.


Step 5
Expand Office Tools.


Click on Image for better View.


Step 6
Click Microsoft Office Document Imaging, and then click Run all from My Computer.


Click on Image for better View.


Step 7
Click Continue.


Now MODI Components installed on your Machine.lets create OCR Application in Visual Stdio.


Step 8
Create a Console Application and give the solution name as SolReadTextFromImage.


Step 9
Copy a Sample image file in Application BaseDirectory.(./bin/debug/SampleImage.JPG)


Click on Image for better View.


Step 10
Add a MODI Reference in our application.so we can use in our application for reading text from image.Right Click on project in Solution Explorer.right click on References,select the COM tab,then select Microsoft Office Document Imaging 12.0 Type Library.  


Click on Image for better View.


Step 11
The Code below will read text from image and store in text file,it is look like this
#region Methods

        /// <summary>
        ///  Read Text from Image and display in console App
        /// </summary>
        /// <param name="ImagePath">specify the Image Path</param>
        private static void ReadTextFromImage(String ImagePath)
        {
            try
            {
                // Grab Text From Image
                MODI.Document ModiObj = new MODI.Document();
                ModiObj.Create(ImagePath);
                ModiObj.OCR(MODI.MiLANGUAGES.miLANG_ENGLISH, true, true);

                //Retrieve the text gathered from the image
                MODI.Image ModiImageObj = (MODI.Image)ModiObj.Images[0];
                

                System.Console.WriteLine(ModiImageObj.Layout.Text);

                ModiObj.Close();
            }
            catch (Exception ex)
            {
                throw new Exception(ex.Message);
            }
        }

        /// <summary>
        ///  Read Text from Image and Store in Text File
        /// </summary>
        /// <param name="ImagePath">specify the Image Path</param>
        /// <param name="StoreTextFilePath">Specify the Store Text File</param>
        private static void ReadTextFromImage(String ImagePath, String StoreTextFilePath)
        {
            try
            {
                // Grab Text From Image
                MODI.Document ModiObj = new MODI.Document();
                ModiObj.Create(ImagePath);
                ModiObj.OCR(MODI.MiLANGUAGES.miLANG_ENGLISH, true, true);

                //Retrieve the text gathered from the image
                MODI.Image ModiImageObj = (MODI.Image)ModiObj.Images[0];
               

                // Store Image Content in Text File
                FileStream CreateFileObj = new FileStream(StoreTextFilePath, FileMode.Create);
                //save the image text in the text file 
                StreamWriter WriteFileObj = new StreamWriter(CreateFileObj);
                WriteFileObj.Write(ModiImageObj.Layout.Text);
                WriteFileObj.Close();

                ModiObj.Close();
            }
            catch (Exception ex)
            {
                throw new Exception(ex.Message); 
            }
        }

        #endregion


Step 12
Call both methods in main function,it is look like this
static void Main(string[] args)
        {
            // Set Sample Image Path
            String ImagePath = AppDomain.CurrentDomain.BaseDirectory + "SampleImage.jpg";

            ReadTextFromImage(ImagePath);

            // Set Store Image Content text file Path
            String StoreTextFilePath = AppDomain.CurrentDomain.BaseDirectory + "SampleText.txt";

            ReadTextFromImage(ImagePath, StoreTextFilePath);
        }


Full Code
using System;
using System.Collections.Generic;
using System.Linq;
using System.Text;
using System.IO;


namespace SolReadTextFromImage
{
    class Program
    {
        static void Main(string[] args)
        {
            // Set Sample Image Path
            String ImagePath = AppDomain.CurrentDomain.BaseDirectory + "SampleImage.jpg";

            ReadTextFromImage(ImagePath);

            // Set Store Image Content text file Path
            String StoreTextFilePath = AppDomain.CurrentDomain.BaseDirectory + "SampleText.txt";

            ReadTextFromImage(ImagePath, StoreTextFilePath);
        }

        #region Methods

        /// <summary>
        ///  Read Text from Image and display in console App
        /// </summary>
        /// <param name="ImagePath">specify the Image Path</param>
        private static void ReadTextFromImage(String ImagePath)
        {
            try
            {
                // Grab Text From Image
                MODI.Document ModiObj = new MODI.Document();
                ModiObj.Create(ImagePath);
                ModiObj.OCR(MODI.MiLANGUAGES.miLANG_ENGLISH, true, true);

                //Retrieve the text gathered from the image
                MODI.Image ModiImageObj = (MODI.Image)ModiObj.Images[0];
               

                System.Console.WriteLine(ModiImageObj.Layout.Text);

                ModiObj.Close();
            }
            catch (Exception ex)
            {
                throw new Exception(ex.Message);
            }
        }

        /// <summary>
        ///  Read Text from Image and Store in Text File
        /// </summary>
        /// <param name="ImagePath">specify the Image Path</param>
        /// <param name="StoreTextFilePath">Specify the Store Text File</param>
        private static void ReadTextFromImage(String ImagePath, String StoreTextFilePath)
        {
            try
            {
                // Grab Text From Image
                MODI.Document ModiObj = new MODI.Document();
                ModiObj.Create(ImagePath);
                ModiObj.OCR(MODI.MiLANGUAGES.miLANG_ENGLISH, true, true);

                //Retrieve the text gathered from the image
                MODI.Image ModiImageObj = (MODI.Image)ModiObj.Images[0];
               

                // Store Image Content in Text File
                FileStream CreateFileObj = new FileStream(StoreTextFilePath, FileMode.Create);
                //save the image text in the text file 
                StreamWriter WriteFileObj = new StreamWriter(CreateFileObj);
                WriteFileObj.Write(ModiImageObj.Layout.Text);
                WriteFileObj.Close();

                ModiObj.Close();
            }
            catch (Exception ex)
            {
                throw new Exception(ex.Message); 
            }
        }

        #endregion
    }
}


Output

Click on Image for better View.

Download
Download source Code