The ObservableCollection<T> is one of the most important features of WPF data binding.Represents a dynamic data collection that provides notifications when items get added, removed, or when the whole list is refreshed.it means When an object is added to or removed from an observable collection, the UI is automatically updated. This happens because, when binding to an observable collection, WPF automatically adds a CollectionChanged event handler to the ObservableCollecion's events.
The main feature of the ObservableCollection<T> are the events it raises when the items it contains change. By implementing the INotifyCollectionChanged and INotifyPropertyChanged interfaces, the collection has events for CollectionChanged and PropertyChanged. All these events are related. The first one is raised whenever something changed in the collection, be it Add, Remove, Move, etc. This also trigger the PropertyChanged event for the Items[] property. When you’re adding or removing items, PropertyChanged is also raised for the Count property.
The ObservableCollection class exists in the System.Collections.ObjectModel namespace.
Let see how to Bind data using ObservableCollection Object in WPF.
Step 1
Download Northwind database from the following link.
http://www.microsoft.com/downloads/details.aspx?FamilyID=06616212-0356-46a0-8da2-eebc53a68034&displaylang=en
Step 2
Step 3
Create a WPF Application and give solution name as SolObservableCollection_WPF.
Step 4
Create a New Folder in Solution and give the Folder Name as ORD,it is look like this

Click on Image for Better View

Click on Image for Better View
Step 6
Open a O/R Designer by double click on NorthwindDC.dbml,it is look like this

Click on Image for Better View

Click on Image for Better View
Visual studio provides an object-relational mapping designer,called the O/R Designer which allows you to visually design the object to database mapping.
Step 7
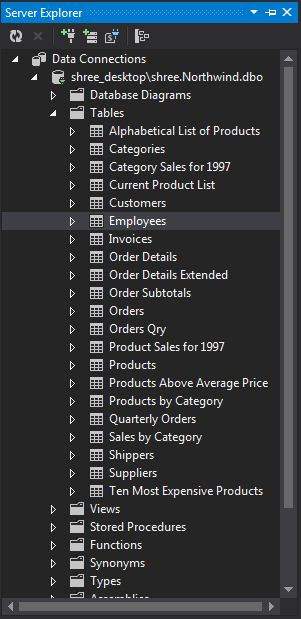
Create a Employee object that will use LINQ to SQL to map to this table.go to the Server Explorer,select Northwind database,go to the Tables and select Employees table,it is look like this

Click on Image for Better View
Drag and drop Employees table from Server explorer onto the design surface of the O/R Designer,it is look like this

Step 9
Now add a DataGrid and Button control on window,it is look like this

Click on Image for Better View
Step 10
Bind Employee Data to DataGrid Using ObservableCollection Object,it is look like this
Step 11
On Button Add Click Event add this following Code,it is look like this
In this way, we can dynamically insert, update and remove items from the DataGrid.
Run the Project.
Output

Click on Image for Better View
After Click on Add Button

Download
Download Source Code
The main feature of the ObservableCollection<T> are the events it raises when the items it contains change. By implementing the INotifyCollectionChanged and INotifyPropertyChanged interfaces, the collection has events for CollectionChanged and PropertyChanged. All these events are related. The first one is raised whenever something changed in the collection, be it Add, Remove, Move, etc. This also trigger the PropertyChanged event for the Items[] property. When you’re adding or removing items, PropertyChanged is also raised for the Count property.
The ObservableCollection class exists in the System.Collections.ObjectModel namespace.
Let see how to Bind data using ObservableCollection Object in WPF.
Step 1
Download Northwind database from the following link.
http://www.microsoft.com/downloads/details.aspx?FamilyID=06616212-0356-46a0-8da2-eebc53a68034&displaylang=en
Step 2
Attach a Northwind database into MS-SQL server.
Step 3
Create a WPF Application and give solution name as SolObservableCollection_WPF.
Step 4
Create a New Folder in Solution and give the Folder Name as ORD,it is look like this

Step 5
Add a Linq to Sql class,Select the ORD folder,right click on Add new Item,select LINQ to SQL classes from installed Visual Studio templates and name it NorthwindDC and click on add button,it is look like this
Click on Image for Better View
Step 6
Open a O/R Designer by double click on NorthwindDC.dbml,it is look like this

Click on Image for Better View

Click on Image for Better View
Visual studio provides an object-relational mapping designer,called the O/R Designer which allows you to visually design the object to database mapping.
Step 7
Create a Employee object that will use LINQ to SQL to map to this table.go to the Server Explorer,select Northwind database,go to the Tables and select Employees table,it is look like this

Click on Image for Better View
Drag and drop Employees table from Server explorer onto the design surface of the O/R Designer,it is look like this

Click on Image for Better View
Step 8
Create a Employee Static Class for retrieving data from Employee Table using Linq or Lambda Expression,it is look like this
using System;
using System.Collections.Generic;
using System.Collections.ObjectModel;
using System.Linq;
using System.Text;

namespace SolObservableCollection_WPF
{
    public class Employee
    {
        #region Methods

        /// <summary>
        /// Get Employee Data from Table
        /// </summary>
        /// <returns>List</returns>
        public static List<ORD.Employee> GetEmployeeData()
        {
            try
            {
                ORD.NorthwindDCDataContext DC = new ORD.NorthwindDCDataContext();

                //// Using Linq

                //var Query = from Q in DC.Employees
                //            select new ORD.Employee
                //            {
                //                FirstName = Q.FirstName,
                //                LastName = Q.LastName,
                //                City = Q.City
                //            };


                // Using Lambda Expression

                var Query = DC.Employees.Select(LE => new ORD.Employee() { FirstName=LE.FirstName,LastName=LE.LastName,City=LE.City });

                return Query.ToList<ORD.Employee>();
            }
            catch (Exception ex)
            {
                throw new Exception(ex.Message);
            }
        }

        #endregion
    }
}
Step 9
Now add a DataGrid and Button control on window,it is look like this
<Grid>
        <Grid.RowDefinitions>
            <RowDefinition Height="281*"/>
            <RowDefinition Height="39*"/>
        </Grid.RowDefinitions>
        <DataGrid x:Name="dgEmployee" Grid.Row="0" Grid.Column="0" AutoGenerateColumns="False" CanUserAddRows="False" ItemsSource="{Binding}">
            <DataGrid.Columns>
                <DataGridTextColumn Header="FirstName" Binding="{Binding FirstName}"></DataGridTextColumn>
                <DataGridTextColumn Header="LastName" Binding="{Binding LastName}"></DataGridTextColumn>
                <DataGridTextColumn Header="City" Binding="{Binding City}"></DataGridTextColumn>
            </DataGrid.Columns>


        </DataGrid>

        <Button x:Name="btnAdd" Grid.Row="1" Grid.Column="0" Content="Add" Height="23" Width="100" HorizontalAlignment="Right" Margin="0,0,10,0" Click="btnAdd_Click"></Button>

    </Grid>

Click on Image for Better View
Step 10
Bind Employee Data to DataGrid Using ObservableCollection Object,it is look like this
#region Declaration

        private ObservableCollection<ORD.Employee> OcEmployeeObj = null;

        #endregion

        #region Constructor

        public MainWindow()
        {
            InitializeComponent();

            try
            {
                // Call Bind Data function in Constructor
                BindData();
            }
            catch (Exception ex)
            {
                MessageBox.Show(ex.Message);
            }
        }

        #endregion

        #region Methods

        /// <summary>
        /// Bind Employee Data to DataGrid
        /// </summary>
        public void BindData()
        {
            try
            {
                // Create Instance of ObervableCollection class which contains element copied from Specified List
                OcEmployeeObj = new ObservableCollection<ORD.Employee>(Employee.GetEmployeeData());

                if (OcEmployeeObj != null)
                {
                    if (OcEmployeeObj.Count >= 0)
                    {
                        // Bind data to DataGrid Object
                        dgEmployee.DataContext = OcEmployeeObj;
                    }
                }
            }
            catch (Exception ex)
            {
                throw new Exception(ex.Message);
            }
        }

        #endregion
Step 11
On Button Add Click Event add this following Code,it is look like this
private void btnAdd_Click(object sender, RoutedEventArgs e)
        {
            try
            {
                // Add a data to ObervableCollection Object and DataGrid is Updated Automatically

                OcEmployeeObj.Add(new ORD.Employee() { FirstName="Kishor",LastName="Naik",City="Thane" });
                OcEmployeeObj.Add(new ORD.Employee() { FirstName = "Ramdas", LastName = "Bhosale", City = "Thane" });
                OcEmployeeObj.Add(new ORD.Employee() { FirstName = "Bhushan", LastName = "Pawar", City = "Thane" });

            }
            catch (Exception ex)
            {
                MessageBox.Show(ex.Message);
            }
        }
In this way, we can dynamically insert, update and remove items from the DataGrid.
Run the Project.
Output

Click on Image for Better View
After Click on Add Button

Download
Download Source Code