In this article i will show you how to generate RDLC report in ASP.net web application.
Step 1
Download northwind database from the following link.
http://www.microsoft.com/downloads/details.aspx?FamilyID=06616212-0356-46a0-8da2-eebc53a68034&displaylang=en
Step 2
Attach a northwind database into MS-SQL server
Step 3
Create a web application and give solution name as SolRDLCReportASP.
Download northwind database from the following link.
http://www.microsoft.com/downloads/details.aspx?FamilyID=06616212-0356-46a0-8da2-eebc53a68034&displaylang=en
Step 2
Attach a northwind database into MS-SQL server
Step 3
Create a web application and give solution name as SolRDLCReportASP.
Step 4
Add AJAX ScriptManger on page,it is look like this
<asp:ScriptManager ID="ScriptManager1" runat="server">
</asp:ScriptManager>
Step 5
Add a ReportViwer control on page from toolbox,it is look like this

Click on image for better view
<asp:UpdatePanel ID="UpdatePanel1" runat="server">
            <ContentTemplate>

                <rsweb:ReportViewer ID="EmployeeReport" runat="server" Width="100%" Height="100%">

                </rsweb:ReportViewer>

            </ContentTemplate>
        </asp:UpdatePanel>
Finally Presentation part done now we Create DataSet Schema and Report Design.
Step 6
First We create a DataSet Schema.it can be define Dataset schema without connecting to any datasource.
Add a DataSet Schema,right click on Add new Item,select DataSet from installed Visual Studio templates and name it NorthwindDataSet and click on add button,it is look like this

Click on image for better view
Step 7
Click on toolbox icon,it is look like this

Click on image for better view
Select DataTable from Toolbox and drag and drop to the dataset design editor,it is look like this
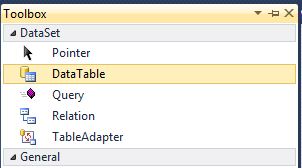
Click on image for better view
Finally Add column to schema,it is look like this

Click on image for better view
DataSet Schema is ready now we create Report Design in web application.
Step 8
Add a RDLC Report,First Create App_Data folder,right click on App_Data folder,select Add new Item,select Report from installed Visual Studio templates and name it NorthwindReport and click on add button,it is look like this

Click on image for better view
Step 9
Add DataSet Schema to the report,it is look like this

Click on image for better view
In the next dialog, give the dataset a name called EmployeeDataSet. Change the data source to NorthwindDataSet and select available dataset Employee and click OK,it is look like this

Click on image for better view
Step 10
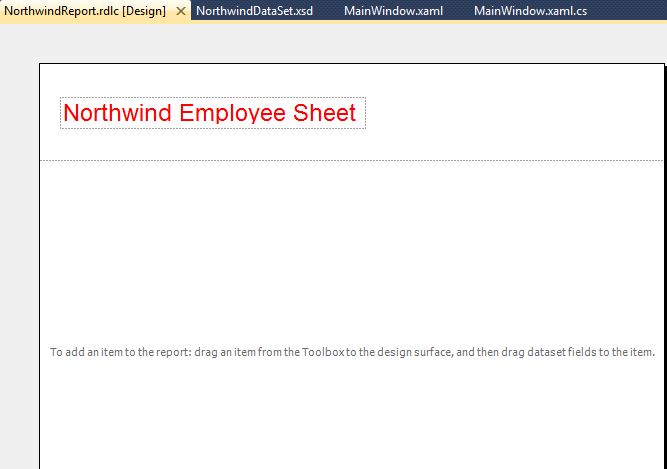
Add Header and Footer on report,it is look like this

Click on image for better view
In Header Section Add TextBox from toolbox,it is look like this

Click on image for better view
In Footer Section Add Page number from build in field,it is look like this

Click on image for better view
Step 11
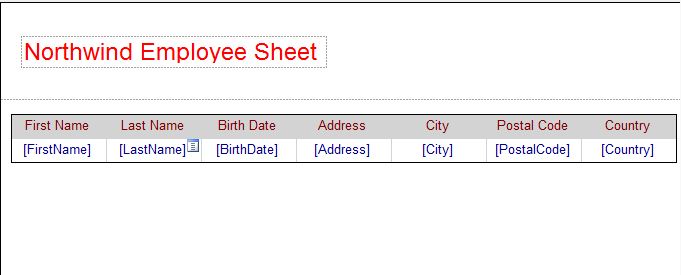
Add Table from toolbox for display employee data,it is look like this

Click on image for better view
Drag and Drop all Employee Fields from NorthwindDataSet into table,it is look like this

Click on image for better view
Finally Report is ready now we move to programming part.
Step 12
Bind Employee data to Dataset Schema,it is look like this
 #region Bind Employee Data to DataSet Schema
    ///
    /// Get Employee data from Northwind database and bind in NorthwindDataSet
    ///
    /// DataTable
    private DataTable GetEmployeeData()
    {
        try
        {
            // Open Sql Connection
            SqlConnection SqlCon = new SqlConnection(@"Data Source=SHREE\SHREE;Initial Catalog=Northwind;Integrated Security=True");
            SqlCon.Open();

            // Create a Command
            SqlCommand SqlComm = new SqlCommand();
            SqlComm.Connection = SqlCon;
            SqlComm.CommandType = CommandType.Text;
            SqlComm.CommandText = "SELECT FirstName,LastName,BirthDate,Address,City,PostalCode,Country FROM Employees";

            // Create instance of Northwind DataSetXSD
            NorthwindDataSet.EmployeeDataTable EmployeeDt = new NorthwindDataSet.EmployeeDataTable();

            // Set a Data Commands
            SqlDataAdapter SqlDa = new SqlDataAdapter(SqlComm);
            SqlDa.Fill(EmployeeDt); // Fill Data in NorthwindDataSet Object.

            return EmployeeDt;

        }
        catch (Exception ex)
        {
            throw new Exception(ex.Message);
        }
    }

    #endregion
Step 13
Display Report in Report Viewer,it is look like this
#region Display Report
    ///
    /// Display Report in Report Viewer
    ///
    private void DisplayReport()
    {
        try
        {
           // Clear the Data Source
           EmployeeReport.LocalReport.DataSources.Clear();

           // Set a DataSource to the report

           // First Parameter - Report DataSet Name
           // Second Parameter - DataSource Object i.e DataTable
           EmployeeReport.LocalReport.DataSources.Add(new ReportDataSource("EmployeeDataSet",GetEmployeeData()));

           // OR Set Report Path
           EmployeeReport.LocalReport.ReportPath = HttpContext.Current.Server.MapPath("~/App_Data/NorthwindReport.rdlc");

           // Refresh and Display Report
           EmployeeReport.LocalReport.Refresh();
        }
        catch (Exception ex)
        {
            throw new Exception(ex.Message);
        }
    }

    #endregion
Call DisplayReport function on Page_Load event,it is look like this
 protected void Page_Load(object sender, EventArgs e)
    {
        try
        {
            if (IsPostBack == false)
            {
                DisplayReport();
            }
        }
        catch (Exception ex)
        {
            throw new Exception(ex.Message);
        }
    }
Run the project.
Output

Click on image for better view
Full Code
1. .Aspx Page Code
<%@ Page Language="C#" AutoEventWireup="true"  CodeFile="Default.aspx.cs" Inherits="_Default" %>

<%@ Register Assembly="Microsoft.ReportViewer.WebForms, Version=10.0.0.0, Culture=neutral, PublicKeyToken=b03f5f7f11d50a3a"
    Namespace="Microsoft.Reporting.WebForms" TagPrefix="rsweb" %>

<!DOCTYPE html PUBLIC "-//W3C//DTD XHTML 1.0 Transitional//EN" "http://www.w3.org/TR/xhtml1/DTD/xhtml1-transitional.dtd">

<html xmlns="http://www.w3.org/1999/xhtml">
<head runat="server">
    <title></title>
</head>
<body>
    <form id="form1" runat="server">
    <div>

        <asp:ScriptManager ID="ScriptManager1" runat="server">
        </asp:ScriptManager>

        <asp:UpdatePanel ID="UpdatePanel1" runat="server">
            <ContentTemplate>

                <rsweb:ReportViewer ID="EmployeeReport" runat="server" Width="100%" Height="100%">

                </rsweb:ReportViewer>

            </ContentTemplate>
        </asp:UpdatePanel>


    </div>
    </form>
</body>
</html>
2. Code behind
using System;
using System.Collections.Generic;
using System.Linq;
using System.Web;
using System.Web.UI;
using System.Web.UI.WebControls;
using System.Data;
using System.Data.SqlClient;
using Microsoft.Reporting.WebForms;

public partial class _Default : System.Web.UI.Page
{
    protected void Page_Load(object sender, EventArgs e)
    {
        try
        {
            if (IsPostBack == false)
            {
                DisplayReport();
            }
        }
        catch (Exception ex)
        {
            throw new Exception(ex.Message);
        }
    }

    #region Bind Employee Data to DataSet Schema
    ///
    /// Get Employee data from Northwind database and bind in NorthwindDataSet
    ///
    /// DataTable
    private DataTable GetEmployeeData()
    {
        try
        {
            // Open Sql Connection
            SqlConnection SqlCon = new SqlConnection(@"Data Source=SHREE\SHREE;Initial Catalog=Northwind;Integrated Security=True");
            SqlCon.Open();

            // Create a Command
            SqlCommand SqlComm = new SqlCommand();
            SqlComm.Connection = SqlCon;
            SqlComm.CommandType = CommandType.Text;
            SqlComm.CommandText = "SELECT FirstName,LastName,BirthDate,Address,City,PostalCode,Country FROM Employees";

            // Create instance of Northwind DataSetXSD
            NorthwindDataSet.EmployeeDataTable EmployeeDt = new NorthwindDataSet.EmployeeDataTable();

            // Set a Data Commands
            SqlDataAdapter SqlDa = new SqlDataAdapter(SqlComm);
            SqlDa.Fill(EmployeeDt); // Fill Data in NorthwindDataSet Object.

            return EmployeeDt;

        }
        catch (Exception ex)
        {
            throw new Exception(ex.Message);
        }
    }

    #endregion

    #region Display Report
    ///
    /// Display Report in Report Viewer
    ///
    private void DisplayReport()
    {
        try
        {
           // Clear the Data Source
           EmployeeReport.LocalReport.DataSources.Clear();

           // Set a DataSource to the report

           // First Parameter - Report DataSet Name
           // Second Parameter - DataSource Object i.e DataTable
           EmployeeReport.LocalReport.DataSources.Add(new ReportDataSource("EmployeeDataSet",GetEmployeeData()));

           // OR Set Report Path
           EmployeeReport.LocalReport.ReportPath = HttpContext.Current.Server.MapPath("~/App_Data/NorthwindReport.rdlc");

           // Refresh and Display Report
           EmployeeReport.LocalReport.Refresh();
        }
        catch (Exception ex)
        {
            throw new Exception(ex.Message);
        }
    }

    #endregion
}
Download
Download Source Code