In a ResouceDictionary we can keep our custom styles, DataTemplates, ControlTemplates, even Custom Definitions of Brush,Color, Background and lot of other stuff. But the important thing is that we have to assign a key to each of them since its a Dictionary. we can also give name to the styles.In short you can create your own theme for appliation.
Step 1
Create a WPF application.
Step 2
Add a ResourceDictionary file in project,go to the solution explorer,right click on project,select Add and click on New Item then select Resource Dictionary(WPF) and give the name as MyDictionary.xaml then click Add,it is look like this

Step 3
In ResourceDictionary file write a XAML code for apply style for button control.it is look like this
Step 4
Now we can initialise the path of Resource Dictionary in Window.Resources element in MainWindow.xaml ,it is look like this
Full XAML Code
Run the project
Download
Download Source Code
Step 1
Create a WPF application.
Step 2
Add a ResourceDictionary file in project,go to the solution explorer,right click on project,select Add and click on New Item then select Resource Dictionary(WPF) and give the name as MyDictionary.xaml then click Add,it is look like this
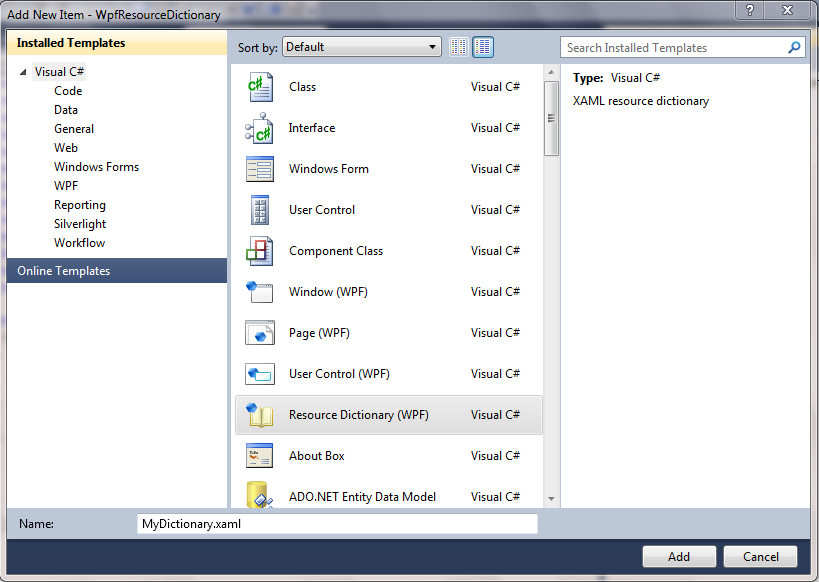
Click on image for better view
Step 3
In ResourceDictionary file write a XAML code for apply style for button control.it is look like this
<ResourceDictionary xmlns="http://schemas.microsoft.com/winfx/2006/xaml/presentation"
                    xmlns:x="http://schemas.microsoft.com/winfx/2006/xaml">

    <Style x:Key="BtnStyle" TargetType="Button">

        <Setter Property="Background" Value="Orange"></Setter>
        <Setter Property="Foreground" Value="Gray"></Setter>

    </Style>
</ResourceDictionary>
Step 4
Now we can initialise the path of Resource Dictionary in Window.Resources element in MainWindow.xaml ,it is look like this
 <Window.Resources>

        <ResourceDictionary>
            <ResourceDictionary.MergedDictionaries>
                <ResourceDictionary Source="MyDictionary.xaml"></ResourceDictionary>
            </ResourceDictionary.MergedDictionaries>
        </ResourceDictionary>

    </Window.Resources>
Step 5
Add a button control on window and then apply style on button control,it is look like this
 <Grid>
        <Button Content="OK" Height="23" HorizontalAlignment="Left" Margin="145,112,0,0" Name="btnOK" VerticalAlignment="Top" Width="75" Style="{StaticResource BtnStyle}" />
        </Grid>
Full XAML Code
<Window x:Class="WpfResourceDictionary.MainWindow"
        xmlns="http://schemas.microsoft.com/winfx/2006/xaml/presentation"
        xmlns:x="http://schemas.microsoft.com/winfx/2006/xaml"
        Title="MainWindow" Height="300" Width="400" Background="gray">
    <Window.Resources>

        <ResourceDictionary>
            <ResourceDictionary.MergedDictionaries>
                <ResourceDictionary Source="MyDictionary.xaml"></ResourceDictionary>
            </ResourceDictionary.MergedDictionaries>
        </ResourceDictionary>

    </Window.Resources>
        <Grid>
        <Button Content="OK" Height="23" HorizontalAlignment="Left" Margin="145,112,0,0" Name="btnOK" VerticalAlignment="Top" Width="75" Style="{StaticResource BtnStyle}" />
        </Grid>
</Window>
Run the project
Download
Download Source Code
日本の開発者のための。
私は日本で働くことは興味深いです
誰もが開発者として募集したい場合は私に知らせてください
スキル - WPF,Silverlight and Window Phone 7


