Wednesday, October 26, 2011

Asp.net - Image Gallery Using DataList in Asp.net

In this article i will show you how to use jQuery to show a larger image when user hovers thumbnail images from a asp.net Datalist control, also use hidden img control to cache the large image when page loads which improves the performance dramatically.


Let see how to bind images in a DataList Control and show large image when user move the mouse cursor to the image using JQuery.


Step 1
First you need to download latest AJAX control toolkit(September 2011 Release) from the following Link.
http://ajaxcontroltoolkit.codeplex.com/releases/view/74023

Step 2
Create a Web Application and give the Solution Name as SolImageGallery.


Step 3
Add Ajax control toolkit on Toolbox tab.


Step 4
Save images in Folder,Create a New Folder in the Solution and give folder name as Images,it is look like this


Click on Image for better view

Step 5
Add XML file in the App_Data folder and give the file name as ImageData.xml,it is look like this


Click on Image for better view


Step 6
The XML in the following example defines an XML document with a root node called Images. This root node contains one or more nodes called Image that include elements called ImageName and ImagePath,it's look like this


    Gaara
    ~/Images/Gaara.png


    Choji Akimichi
    ~/Images/Choji.png


    Jiraiya
    ~/Images/Jiraiya.jpg


    Kakashi Hatake
    ~/Images/Kakashi.png


    Kiba Inuzuka
    ~/Images/Kiba.png
  

    Naruto Uzumaki
    ~/Images/Naruto.jpg


     Neji Hyuuga
     ~/Images/Neji.jpg


     Rock Lee
    ~/Images/RockLee.jpg


     Sai
    ~/Images/Sai.jpg


  Shikamaru Nara
    ~/Images/Shikamaru.jpg


  Shino Aburame
    ~/Images/Shino.jpg


  Yamato
    ~/Images/Yamato.jpg


Step 7
Create an ImageEntity class in App_Code Folder,it is look like this

using System;
using System.Collections.Generic;
using System.Linq;
using System.Web;

public class ImageEntity
{
    #region Property

    public String ImageName
    {
        get;
        set;

    }

    public String ImagePath
    {
        get;
        set;
    }

    #endregion
}


Step 8
Create a ImageView static class in a App_Code folder for retrieving data from XML document.it is look like this
using System;
using System.Collections.Generic;
using System.Linq;
using System.Web;
using System.Xml.Linq;


public static class ImageView
{
    #region Methods

    public static List GetImagesData()
    {
        try
        {
            // Load Xml Document  

            String XmlFile = HttpContext.Current.Server.MapPath("App_Data/ImageData.xml");

            XDocument XDoc = XDocument.Load(XmlFile);

            // Query for retriving all Images data from XML  
            var Query = from Q in XDoc.Descendants("Image")
                        select new ImageEntity
                        {
                            ImageName = Q.Element("ImageName").Value,
                            ImagePath = Q.Element("ImagePath").Value
                        };

            // return images data  
          return Query.ToList<ImageEntity>();
        }
        catch (Exception ex)
        {
            throw new Exception(ex.Message); 
        }
    }

    #endregion
}

Step 9
Add a ToolkitScriptManager control from Ajax toolkit inside the Div Tag,it is look like this
<asp:ToolkitScriptManager ID="ToolkitScriptManager1" runat="server">
</asp:ToolkitScriptManager>

This control allows you to replace the default <asp:scriptmanager> control behavior, and supports the ability to dynamically merge multiple client-side Javascript scripts into a single file that is downloaded to the client at runtime. 


Step 10
Create a CSS for view Large Image and Panel Control,it is look like this


Step 11
Drag a DataList control onto a page. Then, use the following code to set the RepeatColumns property to 4, and set the RepeatDirection property to vertical and set CellSpacing and cellpadding to 5,it is look like this
<asp:DataList ID="DataListImages" runat="server" RepeatColumns="4" RepeatDirection="Vertical" CellPadding="5" CellSpacing="5">
</asp:DataList>

Step 12
Use the following code to set the template in the DataList control to bind to a Image URL to image control and hidden image tag and Create Rounded corner panel with the help of AJAX RoundedCorners Extender,it is look like this

<ItemTemplate>

       <%--Rounded Corner Panel with AJAX RoundedCorner Extender--%>
       <asp:Panel ID="PnlImages" runat="server" CssClass="RoundedCorner">
      
       <div class="RoundedContent">
        
        <a class="ImagePreview" rel="<%#Eval("ImagePath")%>">
         
         <%--Bind Image Path in Image Control--%>
         <asp:Image ID="ImgGallery" runat="server" ImageUrl="<%#Bind('ImagePath')%>" ImageAlign="Middle" Width="150" Height="150" CssClass="ImagePreview" />
        
           <%-- Hidden Image control for caching the images--%>
         <img id="<%#Eval("ImagePath")%>" src="<%#Eval("ImagePath")%>" alt="" style="display:none"/>

        </a>
        
        <%--Bind Image Name in Label--%>
        <asp:Label ID="lblImageName" runat="server" Text='<%#Eval("ImageName")%>' style="color:Red"></asp:Label>

         </div>
    
      </asp:Panel>

                        <%--Add Rounded Corner Extender to the Panel Control--%>
        <asp:RoundedCornersExtender ID="Pnl_RoundedCorner" runat="server" TargetControlID="PnlImages" Corners="All" Radius="15"></asp:RoundedCornersExtender>

 
   </ItemTemplate>


Finally it is look like this
<asp:DataList ID="DataListImages" runat="server" RepeatColumns="4" RepeatDirection="Vertical"
  CellPadding="5" CellSpacing="5">
   <ItemTemplate>

       <%--Rounded Corner Panel with AJAX RoundedCorner Extender--%>
       <asp:Panel ID="PnlImages" runat="server" CssClass="RoundedCorner">
      
       <div class="RoundedContent">
        
        <a class="ImagePreview" rel="<%#Eval("ImagePath")%>">
         
         <%--Bind Image Path in Image Control--%>
         <asp:Image ID="ImgGallery" runat="server" ImageUrl="<%#Bind('ImagePath')%>" ImageAlign="Middle" Width="150" Height="150" CssClass="ImagePreview" />
        
           <%-- Hidden Image control for caching the images--%>
         <img id="<%#Eval("ImagePath")%>" src="<%#Eval("ImagePath")%>" alt="" style="display:none"/>

        </a>
        
        <%--Bind Image Name in Label--%>
        <asp:Label ID="lblImageName" runat="server" Text='<%#Eval("ImageName")%>' style="color:Red"></asp:Label>

         </div>
    
      </asp:Panel>

                        <%--Add Rounded Corner Extender to the Panel Control--%>
        <asp:RoundedCornersExtender ID="Pnl_RoundedCorner" runat="server" TargetControlID="PnlImages" Corners="All" Radius="15"></asp:RoundedCornersExtender>

 
   </ItemTemplate>
  </asp:DataList>


Click on Image for better view


Step 13
Create a Script file for view large image when user move to the mouse cursor to the image using JQuery,give the file name as LargeImagePreview.js
this.LargeImagePreview = function () {

 // these 2 variable determine popup's distance from the cursor
 // you might want to adjust to get the right result
 xOffset = 10;
 yOffset = 10;

 // View Large Image on Mouse Hover Event
 $("a.ImagePreview").hover(function (e) {
  //Get rel Data from hidden Image control.
  var ImgHidden = $(this).attr('rel');

  // Change String 
  // For Example - ~/Images/Kakashi.jpg to Images/Kakashi.jpg
  var ImgSrc = ImgHidden.replace("~/", "");

  // Bind Images in Paragraph tag
  $("body").append("<p id='ImagePreview'><img src='" + ImgSrc + "' alt='loading...' /></p>");

  $("#ImagePreview")
   .css("top", (e.pageY - xOffset) + "px")
   .css("left", (e.pageX + yOffset) + "px")
   .fadeIn("fast");
 },
 function () {
  $("#ImagePreview").remove();
 });
$("a.ImagePreview").mousemove(function (e) {
  $("#ImagePreview")
   .css("top", (e.pageY - xOffset) + "px")
   .css("left", (e.pageX + yOffset) + "px");
 });

};

Step 14
Add jQuery file Reference inside the head tag of the page and call LargeImagePreview function on page load event,it is look like this


Full .Aspx Code
<%@ Page Language="C#" AutoEventWireup="true"  CodeFile="Default.aspx.cs" Inherits="_Default" %>

<%@ Register Assembly="AjaxControlToolkit" Namespace="AjaxControlToolkit" TagPrefix="asp" %>


<!DOCTYPE html PUBLIC "-//W3C//DTD XHTML 1.0 Transitional//EN" "http://www.w3.org/TR/xhtml1/DTD/xhtml1-transitional.dtd">

<html xmlns="http://www.w3.org/1999/xhtml">
<head runat="server">
 <title></title>

 <style type="text/css">
  
  /* Body */
  Body
  {
   background-color:Gray;
   }
  
  
  /** for view Large Image */ 
  #ImagePreview
  {
   position:absolute;
   border:1px solid #ccc;
   background:#333;
   padding:1px;
   display:none;
   color:#fff;
   }
 
 /* Rounded Corner for Panel*/
 .RoundedCorner
 {
  background-color:White;
  width:170px;
  }
  
  .RoundedContent 
   {            
    text-align:center;
    padding:10px;                       
    }
   

 </style>

 <script language="javascript" src="Scripts/jquery-1.4.1.min.js" type="text/javascript"></script>
 <script language="javascript" src="Scripts/LargeImagePreview.js" type="text/javascript"></script>

 <script language="javascript" type="text/javascript">

  $(document).ready(function () {
   
   // Start the Script on Page Load
   LargeImagePreview();
  }
   );

 </script>

</head>
<body>

 <form id="form1" runat="server">
 <div>
  <asp:ToolkitScriptManager ID="ToolkitScriptManager1" runat="server">
  </asp:ToolkitScriptManager>

  <asp:DataList ID="DataListImages" runat="server" RepeatColumns="4" RepeatDirection="Vertical"
  CellPadding="5" CellSpacing="5">
   <ItemTemplate>

       <%--Rounded Corner Panel with AJAX RoundedCorner Extender--%>
       <asp:Panel ID="PnlImages" runat="server" CssClass="RoundedCorner">
      
       <div class="RoundedContent">
        
        <a class="ImagePreview" rel="<%#Eval("ImagePath")%>">
         
         <%--Bind Image Path in Image Control--%>
         <asp:Image ID="ImgGallery" runat="server" ImageUrl="<%#Bind('ImagePath')%>" ImageAlign="Middle" Width="150" Height="150" CssClass="ImagePreview" />
        
           <%-- Hidden Image control for caching the images--%>
         <img id="<%#Eval("ImagePath")%>" src="<%#Eval("ImagePath")%>" alt="" style="display:none"/>

        </a>
        
        <%--Bind Image Name in Label--%>
        <asp:Label ID="lblImageName" runat="server" Text='<%#Eval("ImageName")%>' style="color:Red"></asp:Label>

         </div>
    
      </asp:Panel>

      <%--Add Rounded Corner Extender to the Panel Control--%>
        <asp:RoundedCornersExtender ID="Pnl_RoundedCorner" runat="server" TargetControlID="PnlImages" Corners="All" Radius="15"></asp:RoundedCornersExtender>

 
   </ItemTemplate>
  </asp:DataList>

 </div>
 </form>
</body>
</html>


Step 15
Now Bind Image data in DataList Control,it's look like this
using System;
using System.Collections.Generic;
using System.Linq;
using System.Web;
using System.Web.UI;
using System.Web.UI.WebControls;

public partial class _Default : System.Web.UI.Page 
{
    protected void Page_Load(object sender, EventArgs e)
    {
        try
        {

            if (IsPostBack == false)
            {
                // Call Bind Image Data function on Page Load Event
                BindImageData();
            }

            
        }
        catch (Exception)
        { 
        }
    }

    #region Methods

    /// 
    ///  Bind Image Data into DataList Control
    /// 
    private void BindImageData()
    {
        try
        {
            // Store Data In List Object
           List<ImageEntity> ListObj = ImageView.GetImagesData();

            // Check the List Objetc is null or not
            if (ListObj != null)
            {
                // Check list Object count
                if (ListObj.Count > 0)
                {
                    // Bind Data in DataList Control
                    DataListImages.DataSource = ListObj;
                    DataListImages.DataBind();
                }
            }
        }
        catch (Exception ex)
        {
            throw new Exception(ex.Message); 
        }
    }

    #endregion
}


Run the Project.


Output


Click on Image for better view


Mouse Over Event


Download
Download Source Code

Sunday, October 16, 2011

Silverlight - Paging in DataGrid in Silverlight 4

In this article i will show you how to bind dynamic data to the DataGrid and how will implement data paging in DataGrid in Silverlight 4.


Step 1
Download Northwind database from the following link.
http://www.microsoft.com/downloads/details.aspx?FamilyID=06616212-0356-46a0-8da2-eebc53a68034&displaylang=en


Step 2
Attach a Northwind database into MS-SQL server.


Step 3

Download Silverlight 4 tools from the following link

Download Silverlight 4 toolkit from the following link
http://silverlight.codeplex.com/


Note : Select only April 2010 Toolkit Silverlight 4


Step 4
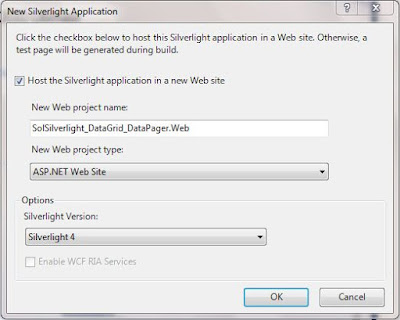
Create a Silverlight Application and give the solution name as SolSilverlight_DataGrid_DataPager.


Click on image for better view


Note: Select Web Project Type as ASP.NET Web site.


Step 5
In MainPage.xaml page, drag and drop DataGrid and DataPager in Grid and add respective DatagridTextColumns in DataGrid for binding data,it is look like this


Click on image for better view


<Grid x:Name="LayoutRoot" Background="White">
  <Grid.RowDefinitions>
   <RowDefinition Height="262*" />
   <RowDefinition Height="58*" />
  </Grid.RowDefinitions>
  <sdk:DataGrid x:Name="DgEmployee" Grid.Row="0" Grid.Column="0" AutoGenerateColumns="False" IsReadOnly="True" GridLinesVisibility="All" ItemsSource="{Binding}" >
   <sdk:DataGrid.Columns>
    <sdk:DataGridTextColumn Header="FirstName" Binding="{Binding FirstName}"/>
    <sdk:DataGridTextColumn Header="LastName" Binding="{Binding LastName}"/>
    <sdk:DataGridTextColumn Header="BirthDate" Binding="{Binding BirthDate}"/>
    <sdk:DataGridTextColumn Header="City" Binding="{Binding City}"/>
   </sdk:DataGrid.Columns>
  </sdk:DataGrid>
  
  <sdk:DataPager x:Name="DpEmployee" Grid.Row="1" Grid.Column="0" VerticalAlignment="Top" DisplayMode="FirstLastPreviousNextNumeric"  PageSize="3"/>
 </Grid>


Click on image for better view


Now Design part done.let's move to the Code behind part.


Step 6
Select a ASP.net Web Application (SolSilverlight_DataGrid_DataPager.WebAdd app_code folder in the solution and add a new folder inside the app_code folder and give folder name as ORD,it is look like this


Click on image for better view


Step 7
Add a Linq to Sql class,Select the ORD folder,right click on Add new Item,selectLINQ to SQL classes from installed Visual Studio templates and name it NorthwindDC and click on add button,it is look like this


Click on image for better view


Step 8
Open a O/R Designer by double click on NorthwindDC.dbml,it is look like this


Click on image for better view


Click on image for better view


Visual stdio provides an object-relational mapping designer,called the O/R Designer which allows you to visually design the object to database mapping.


Step 9

Create a Employee object.
In this example we have to work with employees table of the Northwind database,create a employee object that will use LINQ to SQL to map to this table.go to the server explorer,select northwind database,go to the tables and select Employees table,it is look like this


Click on image for better view


Drag and drop Employee table from Server explorer onto the design surface of the O/R Designer,it is look like this


Click on image for better view


Step 10
Select a ASP.net Web application (SolSilverlight_DataGrid_DataPager.Web) and add WCF Service,right click on solution,select Add New Item,select WCF Service from installed Visual Studio templates and name it EmployeeService.svc and click on add button.,it is look like this


It will add two .cs (named IEmployeeService.cs and EmployeeService.cs)


Click on image for better view


Step 11
Now we will make some modification to the OperationContract.Remove default DoWork method from the IEmployeeService interface.Add a new Method named as GetEmployeeData,it is look like this
using System;
using System.Collections.Generic;
using System.Linq;
using System.Runtime.Serialization;
using System.ServiceModel;
using System.Text;

// NOTE: You can use the "Rename" command on the "Refactor" menu to change the interface name "IEmployeeService" in both code and config file together.
[ServiceContract]
public interface IEmployeeService
{
    [OperationContract]
    List<ord.employee> GetEmployeeData();
}

Step 12
Implement IEmployeeService interface in EmployeeService class, retriving an employee data from database,it is look like this
using System;
using System.Collections.Generic;
using System.Linq;
using System.Runtime.Serialization;
using System.ServiceModel;
using System.Text;
using ORD;

// NOTE: You can use the "Rename" command on the "Refactor" menu to change the class name "EmployeeService" in code, svc and config file together.
public class EmployeeService : IEmployeeService
{
    /// 
    /// Get Employee Data From Northwind Database
    /// 
    /// List
    public List<Employee> GetEmployeeData()
    {
        try
        {
            ORD.NorthwindDCDataContext DC = new NorthwindDCDataContext(System.Configuration.ConfigurationManager.ConnectionStrings["NorthwindConnectionString"].ConnectionString.Trim());

            var Query = from Q in DC.Employees
                        select new ORD.Employee
                        {
                            FirstName = Q.FirstName,
                            LastName = Q.LastName,
                            BirthDate =Q.BirthDate,
                            City = Q.City
                        };

            return Query.ToList<ORD.Employee>();
        }
        catch (Exception ex)
        {
            throw new Exception(ex.Message); 
        }
    }
}


Step 13
Add a Service Reference of  WCF Service in silverlight application(SolSilverlight_DataGrid_DataPager).Right click the Silverlight project and add a Service reference,it is look like this


Click on image for better view


Step 14
Add a WCF service in the silverlight application.Add Service Reference dialog box will open and click on Discover button and give the namesapace name as EmployeeServiceReference.


Click on image for better view


Step 15
Get List of Employee Data from WCF Service and Bind to the DataGrid then Bind Item Source of the DataGrid to the DataPager control,it is look like this

using System;
using System.Collections.Generic;
using System.Linq;
using System.Net;
using System.Windows;
using System.Windows.Controls;
using System.Windows.Documents;
using System.Windows.Input;
using System.Windows.Media;
using System.Windows.Media.Animation;
using System.Windows.Shapes;

namespace SolSilverlight_DataGrid_DataPager
{
    public partial class MainPage : UserControl
    {
        public MainPage()
        {
            InitializeComponent();

            try
            {
                // Call Employee Service Method in Constructor
                CallEmployeeWCFService();
            }
            catch (Exception ex)
            {
                MessageBox.Show(ex.Message);
            }
        }


        #region Methods

        private void CallEmployeeWCFService()
        {
            try
            {
                // Call WCF Service
                EmployeeServiceReference.EmployeeServiceClient EmployeeServiceClientObj = new EmployeeServiceReference.EmployeeServiceClient();

                // Wire up the Async Completed  handler
               EmployeeServiceClientObj.GetEmployeeDataCompleted += new EventHandler<EmployeeServiceReference.GetEmployeeDataCompletedEventArgs>(EmployeeServiceClientObj_GetEmployeeDataCompleted);

                // Call WCF Method 
                EmployeeServiceClientObj.GetEmployeeDataAsync();
            }
            catch (Exception ex)
            {
                throw new Exception(ex.Message); 
            }
        }

        void EmployeeServiceClientObj_GetEmployeeDataCompleted(object sender, EmployeeServiceReference.GetEmployeeDataCompletedEventArgs e)
        {
            try
            {
                // Wrap list Employee to paged Collection view then bind to data grid
                DgEmployee.DataContext = new System.Windows.Data.PagedCollectionView(e.Result);

                // Bind item source of Employee DataGrid to the Data Pager Control
                DpEmployee.Source = DgEmployee.ItemsSource;
            }
            catch (Exception ex)
            {
                MessageBox.Show(ex.Message); 
            }
        }

        #endregion

    }


}


Run the Project.

Output


Click on image for better view


Full XAML Code
<UserControl
 xmlns="http://schemas.microsoft.com/winfx/2006/xaml/presentation"
 xmlns:x="http://schemas.microsoft.com/winfx/2006/xaml"
 xmlns:d="http://schemas.microsoft.com/expression/blend/2008"
 xmlns:mc="http://schemas.openxmlformats.org/markup-compatibility/2006"
 xmlns:sdk="http://schemas.microsoft.com/winfx/2006/xaml/presentation/sdk" x:Class="SolSilverlight_DataGrid_DataPager.MainPage"
 mc:Ignorable="d"
 d:DesignHeight="320" d:DesignWidth="630">

 <Grid x:Name="LayoutRoot" Background="White">
  <Grid.RowDefinitions>
   <RowDefinition Height="262*" />
   <RowDefinition Height="58*" />
  </Grid.RowDefinitions>
  <sdk:DataGrid x:Name="DgEmployee" Grid.Row="0" Grid.Column="0" AutoGenerateColumns="False" IsReadOnly="True" GridLinesVisibility="All" ItemsSource="{Binding}" >
   <sdk:DataGrid.Columns>
    <sdk:DataGridTextColumn Header="FirstName" Binding="{Binding FirstName}"/>
    <sdk:DataGridTextColumn Header="LastName" Binding="{Binding LastName}"/>
    <sdk:DataGridTextColumn Header="BirthDate" Binding="{Binding BirthDate}"/>
    <sdk:DataGridTextColumn Header="City" Binding="{Binding City}"/>
   </sdk:DataGrid.Columns>
  </sdk:DataGrid>
  
  <sdk:DataPager x:Name="DpEmployee" Grid.Row="1" Grid.Column="0" VerticalAlignment="Top" DisplayMode="FirstLastPreviousNextNumeric"  PageSize="3"/>
 </Grid>
</UserControl>


Download
Download Source Code

Thursday, October 13, 2011

AJAX - ModalPopUpExtender in GridView

The ModalPopup extender allows a page to display content to the user in a "modal" manner which prevents the user from interacting with the rest of the page. The modal content can be any hierarchy of controls and is displayed above a background that can have a custom style applied to it. 


In this Article i will show you how to use AJAX ModelPopupExtender in GridView to display parent child data.


Step 1
Download Northwind database from the following link.
http://www.microsoft.com/downloads/details.aspx?FamilyID=06616212-0356-46a0-8da2-eebc53a68034&displaylang=en


Step 2
Attach a Northwind database into MS-SQL server.


Step 3
Create a Web application and give the solution name as SolModelPopUpExtenderInGridView.


Step 4
Add a ToolkitScriptManager control from Ajax toolkit inside the Div Tag,it is look like this
<asp:ToolkitScriptManager ID="ToolkitScriptManager1" runat="server">
</asp:ToolkitScriptManager>

This control allows you to replace the default <asp:scriptmanager> control behavior, and supports the ability to dynamically merge multiple client-side Javascript scripts into a single file that is downloaded to the client at runtime. 


Step 5
Drag and place an Update Panel on the page.we will put GridView and Modal PopUp inside it. 
<asp:UpdatePanel ID="UpdatePanel1" runat="server">
            
         <ContentTemplate>  
         </ContentTemplate>

</asp:UpdatePanel>


Step 6
Create a CSS for Modal PopUp Extender and Panel,it is look like this


Step 7
Now drag and drop GridView inside content template of Update Panel,in this example i have used Employee table of Northwind Database, it is look like this
<asp:GridView ID="GvEmployee" runat="server" AutoGenerateColumns="False" 
                                BackColor="White" BorderColor="#999999" BorderStyle="Solid" BorderWidth="1px" 
                                CellPadding="3" EnableModelValidation="True" ForeColor="Black" 
                                GridLines="Vertical">
                                <AlternatingRowStyle BackColor="#CCCCCC" />
                                <Columns>
                                    <asp:TemplateField>
                                        <ItemTemplate>
                                            <asp:LinkButton ID="btnLinkView" runat="server" onclick="btnLinkView_Click">View</asp:LinkButton>
                                        </ItemTemplate>
                                    </asp:TemplateField>
                                    <asp:BoundField DataField="FirstName" HeaderText="FirstName" />
                                    <asp:BoundField DataField="LastName" HeaderText="LastName" />
                                    <asp:BoundField DataField="BirthDate" HeaderText="BirthDate" />
                                    <asp:BoundField DataField="City" HeaderText="City" />
                                </Columns>
                                <FooterStyle BackColor="#CCCCCC" />
                                <HeaderStyle BackColor="Black" Font-Bold="True" ForeColor="White" />
                                <PagerStyle BackColor="#999999" ForeColor="Black" HorizontalAlign="Center" />
                                <SelectedRowStyle BackColor="#000099" Font-Bold="True" ForeColor="White" />
                            </asp:GridView>


Click on Image for better view


Step 8
Now add a panel with controls to display details,it is look like this

<asp:Panel ID="PnlEmployee" runat="server" CssClass="ModalPopup" style="display:none">
                                    
                                    <table border="1" cellpadding="5" cellspacing="5" width="100%" align="center" style="border-color: #FF6600">
                                            <tr>
                                                <td>First Name</td>
                                                <td><asp:Label ID="lblFirstName" runat="server"></asp:Label></td>
                                            </tr>
                                             <tr>
                                                <td>Last Name</td>
                                                <td><asp:Label ID="lblLastName" runat="server"></asp:Label></td>
                                            </tr>
                                            <tr>
                                                <td>BirthDate</td>
                                                <td><asp:Label ID="lblBirthDate" runat="server"></asp:Label></td>
                                            </tr>
                                            <tr>
                                                <td>City</td>
                                                <td><asp:Label ID="lblCity" runat="server"></asp:Label></td>
                                            </tr>
                                            <tr align="center" valign="middle">
                                                <td colspan="2">
                                                    <asp:Button ID="btnClose" runat="server" Text="Close" />
                                                </td>
                                            </tr>

                                    </table>
                                                                    
                            </asp:Panel>


Click on Image for better view


Step 9
 Add a hidden button control to activate modal PopUp,it is look like this
<asp:Button ID="btnControl" runat="server" style="display:none" />


Step 10
Add a Extender to Panel Control,it is look like this


Click on Image for better view


Click on Add Extender link and Extender Wizard dialog box will be open and select ModalPopUpExtender and click on OK button.


Click on Image for better view

<asp:ModalPopupExtender ID="PnlEmployee_ModalPopupExtender" runat="server" 
                                DynamicServicePath="" Enabled="True" TargetControlID="btnControl" 
                                PopupControlID="PnlEmployee" BackgroundCssClass="ModalBackground" 
                                DropShadow="true" CancelControlID="btnClose">
                            </asp:ModalPopupExtender>


AJAX ModalPopUpExtender Properties


  1. TargetControlID
    • The ID of the element that activates the modal popup
  2. PopupControlID
    • The ID of the element to display as a modal popup
  3. BackgroundCssClass
    • The CSS class to apply to the background when the modal popup is displayed
  4. DropShadow
    • True to automatically add a drop-shadow to the modal popup
  5. CancelControlID
    • The ID of the element that cancels the modal popup


Finally Design part done now we switch into Code behind Part.


Step 10
Create a Employee static class in app_code folder for retriving an employee data from database,it is look like this

using System;
using System.Collections.Generic;
using System.Linq;
using System.Web;
using System.Data;
using System.Data.SqlClient;  

public static class Employee
{
    /// 
    ///  Get Employee Data from Northwind Database
    /// 
    /// DataTable
    public static  DataTable GetEmployeeData()
    {
        try
        {
            SqlConnection SqlCon = new SqlConnection(@"Data Source=SHREE\SHREE;Initial Catalog=Northwind;Integrated Security=True");
            SqlCon.Open();

            SqlCommand SqlComm = new SqlCommand("SELECT * FROM Employees", SqlCon);
            DataTable Table = new DataTable();

            SqlDataAdapter SqlDa = new SqlDataAdapter(SqlComm);
            SqlDa.Fill(Table);

            return Table;
        }
        catch (Exception ex)
        {
            throw new Exception(ex.Message); 
        }
    }
}


Step 11
Bind Employee data to GridView,it is look like this

protected void Page_Load(object sender, EventArgs e)
    {

        if (IsPostBack == false)
        {
            BindEmployeeData();
        }
    }

    #region Method

    /// 
    ///  Bind Employee Data to GridView
    /// 
    private void BindEmployeeData()
    {
        try
        {

            DataTable Table = Employee.GetEmployeeData();

            if (Table != null)
            {
                if (Table.Rows.Count > 0)
                {
                    GvEmployee.DataSource = Table;
                    GvEmployee.DataBind();
                }
            }

            
        }
        catch (Exception ex)
        {
            throw new Exception(ex.Message); 
        }
    }

    #endregion


Step 12
Write a below code in click event of LinkButton in GridView to populate details,it is look like this

protected void btnLinkView_Click(object sender, EventArgs e)
    {
        try
        {

            LinkButton btnLinkView = sender as LinkButton;

            GridViewRow GVEmployeeRow =(GridViewRow) btnLinkView.NamingContainer;

            lblFirstName.Text = GVEmployeeRow.Cells[1].Text.Trim();
            lblLastName.Text = GVEmployeeRow.Cells[2].Text.Trim();
            lblBirthDate.Text = GVEmployeeRow.Cells[3].Text.Trim();
            lblCity.Text = GVEmployeeRow.Cells[4].Text.Trim();

            PnlEmployee_ModalPopupExtender.Show();

        }
        catch (Exception)
        { }
    }


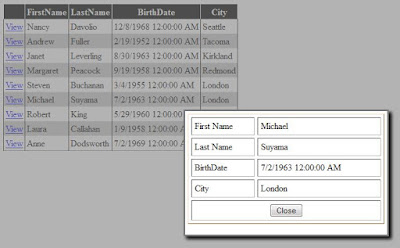
Run the Project.


Output


Click on Image for better view


Full Source Code


1. .Aspx Code
<%@ Page Language="C#" AutoEventWireup="true"  CodeFile="Default.aspx.cs" Inherits="_Default" %>

<%@ Register Assembly="AjaxControlToolkit" Namespace="AjaxControlToolkit" TagPrefix="asp" %>

<!DOCTYPE html PUBLIC "-//W3C//DTD XHTML 1.0 Transitional//EN" "http://www.w3.org/TR/xhtml1/DTD/xhtml1-transitional.dtd">

<html xmlns="http://www.w3.org/1999/xhtml">
<head runat="server">
    <title></title>

    <style type="text/css">
    
             .ModalBackground
            {
                  background-color: Gray;
                  filter: alpha(opacity=60);
                  opacity: 0.6;
                  z-index: 10000;
            }
 
            .ModalPopup
            {
                  background-color:White;
                  border-width:3px;
                  border-style:solid;
                  border-color:Gray;
                  padding:5px;
                  width: 350px; <%--Change width of the panel--%>
                  height:210px;<%-- Change height of the Panel--%>
            }
       
    </style>
</head>
<body>
    <form id="form1" runat="server">
    <div>
        <asp:ToolkitScriptManager ID="ToolkitScriptManager1" runat="server">
        </asp:ToolkitScriptManager>
        
        <asp:UpdatePanel ID="UpdatePanel1" runat="server">
            
            <ContentTemplate>
                
                            
                            <asp:GridView ID="GvEmployee" runat="server" AutoGenerateColumns="False" 
                                BackColor="White" BorderColor="#999999" BorderStyle="Solid" BorderWidth="1px" 
                                CellPadding="3" EnableModelValidation="True" ForeColor="Black" 
                                GridLines="Vertical">
                                <AlternatingRowStyle BackColor="#CCCCCC" />
                                <Columns>
                                    <asp:TemplateField>
                                        <ItemTemplate>
                                            <asp:LinkButton ID="btnLinkView" runat="server" onclick="btnLinkView_Click">View</asp:LinkButton>
                                        </ItemTemplate>
                                    </asp:TemplateField>
                                    <asp:BoundField DataField="FirstName" HeaderText="FirstName" />
                                    <asp:BoundField DataField="LastName" HeaderText="LastName" />
                                    <asp:BoundField DataField="BirthDate" HeaderText="BirthDate" />
                                    <asp:BoundField DataField="City" HeaderText="City" />
                                </Columns>
                                <FooterStyle BackColor="#CCCCCC" />
                                <HeaderStyle BackColor="Black" Font-Bold="True" ForeColor="White" />
                                <PagerStyle BackColor="#999999" ForeColor="Black" HorizontalAlign="Center" />
                                <SelectedRowStyle BackColor="#000099" Font-Bold="True" ForeColor="White" />
                            </asp:GridView>


                            <asp:Panel ID="PnlEmployee" runat="server" CssClass="ModalPopup" style="display:none">
                                    
                                    <table border="1" cellpadding="5" cellspacing="5" width="100%" align="center" style="border-color: #FF6600">
                                            <tr>
                                                <td>First Name</td>
                                                <td><asp:Label ID="lblFirstName" runat="server"></asp:Label></td>
                                            </tr>
                                             <tr>
                                                <td>Last Name</td>
                                                <td><asp:Label ID="lblLastName" runat="server"></asp:Label></td>
                                            </tr>
                                            <tr>
                                                <td>BirthDate</td>
                                                <td><asp:Label ID="lblBirthDate" runat="server"></asp:Label></td>
                                            </tr>
                                            <tr>
                                                <td>City</td>
                                                <td><asp:Label ID="lblCity" runat="server"></asp:Label></td>
                                            </tr>
                                            <tr align="center" valign="middle">
                                                <td colspan="2">
                                                    <asp:Button ID="btnClose" runat="server" Text="Close" />
                                                </td>
                                            </tr>

                                    </table>
                                                                    
                            </asp:Panel>

                            <asp:Button ID="btnControl" runat="server" style="display:none" />

                            <asp:ModalPopupExtender ID="PnlEmployee_ModalPopupExtender" runat="server" 
                                DynamicServicePath="" Enabled="True" TargetControlID="btnControl" 
                                PopupControlID="PnlEmployee" BackgroundCssClass="ModalBackground" 
                                DropShadow="true" CancelControlID="btnClose">
                            </asp:ModalPopupExtender>


            </ContentTemplate>

        </asp:UpdatePanel>

    </div>
    </form>
</body>
</html>

2.Code Behind
using System;
using System.Collections.Generic;
using System.Linq;
using System.Web;
using System.Web.UI;
using System.Web.UI.WebControls;
using System.Data;

public partial class _Default : System.Web.UI.Page 
{
    protected void Page_Load(object sender, EventArgs e)
    {

        if (IsPostBack == false)
        {
            BindEmployeeData();
        }
    }

    #region Method

    /// 
    ///  Bind Employee Data to GridView
    /// 
    private void BindEmployeeData()
    {
        try
        {

            DataTable Table = Employee.GetEmployeeData();

            if (Table != null)
            {
                if (Table.Rows.Count > 0)
                {
                    GvEmployee.DataSource = Table;
                    GvEmployee.DataBind();
                }
            }

            
        }
        catch (Exception ex)
        {
            throw new Exception(ex.Message); 
        }
    }

    #endregion

    protected void btnLinkView_Click(object sender, EventArgs e)
    {
        try
        {

            LinkButton btnLinkView = sender as LinkButton;

            GridViewRow GVEmployeeRow =(GridViewRow) btnLinkView.NamingContainer;

            lblFirstName.Text = GVEmployeeRow.Cells[1].Text.Trim();
            lblLastName.Text = GVEmployeeRow.Cells[2].Text.Trim();
            lblBirthDate.Text = GVEmployeeRow.Cells[3].Text.Trim();
            lblCity.Text = GVEmployeeRow.Cells[4].Text.Trim();

            PnlEmployee_ModalPopupExtender.Show();

        }
        catch (Exception)
        { }
    }


}


Download
Download Source Code

Thursday, October 6, 2011

ASP.net - Google Buzz Post Message from ASP.net

In this article i will show you how to post message on Google Buzz from Asp.net.


Step 1
Google Buzz require a valid gmail account. You need to decide, from which gmail account you would like to post google buzz. For this example, i would be posting google buzz from my gmail account.


Step 2
Enable Google Buzz posting by sending email. Please follow following to do so.

  • Log into your Gmail Account.
  • Open Google Buzz.
  • Click on Connected Sites link as shown in figure.

Click on Image for Better View

  • Click on Add button associated with "Post via buzz@gmail"

Click on Image for Better View
  • Click on Save Button

Step 3
Create a Web Application and give solution name as SolGoogleBuzz.

Step 4
Create a Form in .aspx page for sending message to Google Buzz,it is look like this

<div style="text-align:center">
            <h3 >Google Buzz Post Message from ASP.net</h3>
            <table border="0" cellpadding="5" cellspacing="5" align="center" width="50%">
                <tr align="left">
                    <td>Gmail MailID</td>
                    <td><asp:TextBox ID="txtGmailMailID" runat="server" Height="23px" Width="258px"></asp:TextBox></td>
                </tr>
                 <tr align="left">
                    <td>Gmail Password</td>
                    <td>
                        <asp:TextBox ID="txtGmailPassword" runat="server" Height="23px" Width="258px" TextMode="Password"></asp:TextBox>
                     </td>
                </tr>
                <tr align="left">
                    <td>Post Message</td>
                    <td>
                        <asp:TextBox ID="txtPostMessage" runat="server" Height="83px" 
                            TextMode="MultiLine" Width="260px" ></asp:TextBox>
                    </td>
                </tr>
                <tr align="center">
                    <td colspan="2" valign="middle">
                        <asp:Button ID="btnPost" runat="server" Text="Post on Google Buzz" 
                            onclick="btnPost_Click" />
                    </td>
                </tr>
                <tr align="center">
                    <td colspan="2" valign="middle">
                        <asp:Label ID="lblSuccessMessage" runat="server"></asp:Label>
                    </td>
                </tr>
            </table>
    </div>


Click on Image for Better View


Step 5
In Code Behind write a function  to send message to the Google Buzz,it is look like this
#region Methods
    /// 
    ///  Post Message on Google Buzz
    /// 
    /// 
Specify the Gmail Id    /// 
Specify the Gmail Password    /// 
Post a Message    /// Boolean
    private Boolean PostBuzzMessage(String GMailID, String GMailPassword, String Message)
    {
        Boolean Flag = false;
        try
        {
            //Create Mail Message Object with content that you want to send with mail.
            System.Net.Mail.MailMessage GMailMessage = new System.Net.Mail.MailMessage(GMailID, "buzz@gmail.com",Message,String.Empty);

            GMailMessage.IsBodyHtml = false;

            //Proper Authentication Details need to be passed when sending email from gmail
            System.Net.NetworkCredential GMailAuthentication = new System.Net.NetworkCredential(GMailID,GMailPassword);

            //Smtp Mail server of Gmail is "smpt.gmail.com" and it uses port no. 587
            //For different server like yahoo this details changes and you can
            //get it from respective server.
            System.Net.Mail.SmtpClient GMailClient = new System.Net.Mail.SmtpClient("smtp.gmail.com", 587);

            //Enable SSL
            GMailClient.EnableSsl = true;

            GMailClient.UseDefaultCredentials = false;

            GMailClient.Credentials = GMailAuthentication;

            // Send Message 
            GMailClient.Send(GMailMessage);

            Flag = true;
        }
        catch (Exception ex)
        {
            throw new Exception(ex.Message); 
        }

        return Flag;
    }

    #endregion

Step 6
Call a above function on Button click event,it is look like this
protected void btnPost_Click(object sender, EventArgs e)
    {
        try
        {
            if (PostBuzzMessage(txtGmailMailID.Text.Trim(), txtGmailPassword.Text.Trim(), txtPostMessage.Text.Trim()))
            {
                lblSuccessMessage.Text = "Succesfully Post Message on Google Buzz";
            }
            else
            {
                lblSuccessMessage.Text = "OOps....We got an ERROR";
            }
        }
        catch (Exception)
        { }
    }

Step 7
Run the project and send message,it is look like this
Click on Image for Better View


Step 8
Now Check your Buzz to see message,it is look like this


Click on Image for Better View


Full Code


1. .Aspx Code

<%@ Page Language="C#" AutoEventWireup="true"  CodeFile="Default.aspx.cs" Inherits="_Default" %>

<!DOCTYPE html PUBLIC "-//W3C//DTD XHTML 1.0 Transitional//EN" "http://www.w3.org/TR/xhtml1/DTD/xhtml1-transitional.dtd">

<html xmlns="http://www.w3.org/1999/xhtml">
<head runat="server">
    <title></title>
</head>
<body>
    <form id="form1" runat="server">
    <div style="text-align:center">
            <h3 >Google Buzz Post Message from ASP.net</h3>
            <table border="0" cellpadding="5" cellspacing="5" align="center" width="50%">
                <tr align="left">
                    <td>Gmail MailID</td>
                    <td><asp:TextBox ID="txtGmailMailID" runat="server" Height="23px" Width="258px"></asp:TextBox></td>
                </tr>
                 <tr align="left">
                    <td>Gmail Password</td>
                    <td>
                        <asp:TextBox ID="txtGmailPassword" runat="server" Height="23px" Width="258px" TextMode="Password"></asp:TextBox>
                     </td>
                </tr>
                <tr align="left">
                    <td>Post Message</td>
                    <td>
                        <asp:TextBox ID="txtPostMessage" runat="server" Height="83px" 
                            TextMode="MultiLine" Width="260px" ></asp:TextBox>
                    </td>
                </tr>
                <tr align="center">
                    <td colspan="2" valign="middle">
                        <asp:Button ID="btnPost" runat="server" Text="Post on Google Buzz" 
                            onclick="btnPost_Click" />
                    </td>
                </tr>
                <tr align="center">
                    <td colspan="2" valign="middle">
                        <asp:Label ID="lblSuccessMessage" runat="server"></asp:Label>
                    </td>
                </tr>
            </table>
    </div>
    </form>
</body>
</html>

2. .Code Behind
using System;
using System.Collections.Generic;
using System.Linq;
using System.Web;
using System.Web.UI;
using System.Web.UI.WebControls;

public partial class _Default : System.Web.UI.Page 
{
    protected void Page_Load(object sender, EventArgs e)
    {

    }

    #region Methods
    /// 
    ///  Post Message on Google Buzz
    /// 
    /// 
Specify the Gmail Id    /// 
Specify the Gmail Password    /// 
Post a Message    /// Boolean
    private Boolean PostBuzzMessage(String GMailID, String GMailPassword, String Message)
    {
        Boolean Flag = false;
        try
        {
            //Create Mail Message Object with content that you want to send with mail.
            System.Net.Mail.MailMessage GMailMessage = new System.Net.Mail.MailMessage(GMailID, "buzz@gmail.com",Message,String.Empty);

            GMailMessage.IsBodyHtml = false;

            //Proper Authentication Details need to be passed when sending email from gmail
            System.Net.NetworkCredential GMailAuthentication = new System.Net.NetworkCredential(GMailID,GMailPassword);

            //Smtp Mail server of Gmail is "smpt.gmail.com" and it uses port no. 587
            //For different server like yahoo this details changes and you can
            //get it from respective server.
            System.Net.Mail.SmtpClient GMailClient = new System.Net.Mail.SmtpClient("smtp.gmail.com", 587);

            //Enable SSL
            GMailClient.EnableSsl = true;

            GMailClient.UseDefaultCredentials = false;

            GMailClient.Credentials = GMailAuthentication;

            // Send Message 
            GMailClient.Send(GMailMessage);

            Flag = true;
        }
        catch (Exception ex)
        {
            throw new Exception(ex.Message); 
        }

        return Flag;
    }

    #endregion

    protected void btnPost_Click(object sender, EventArgs e)
    {
        try
        {
            if (PostBuzzMessage(txtGmailMailID.Text.Trim(), txtGmailPassword.Text.Trim(), txtPostMessage.Text.Trim()))
            {
                lblSuccessMessage.Text = "Succesfully Post Message on Google Buzz";
            }
            else
            {
                lblSuccessMessage.Text = "OOps....We got an ERROR";
            }
        }
        catch (Exception)
        { }
    }
}

Download
Download Source Code