Tuesday, November 27, 2012

WP7 - Send SMS in Window Phone 7

In this article i will explain you how to send SMS in window phone 7.Sending a SMS is a feature of the Windows Phone operating system and can be used by the Launcher API. it uses the SmsComposeTask Launcher to open the native device SMS editor and give the user an option to send the SMS or discard it.


Step 1
To Develop application for Windows Phone 7 devices, you need to install Windows Phone 7.1 SDK.You can download latest SDK for Windows Phone
http://www.microsoft.com/en-us/download/details.aspx?displaylang=en&id=27570

SDK 7.1.1 Update
https://dev.windowsphone.com/en-us/downloadsdk


Step 2
Create a Window Phone Application and give the solution name as SendSMSinWP7.
To start creating a new Windows Phone application, start Microsoft Visual Studio then create a new Project and select Windows Phone Application Template,it is look like this


Click on Image for better View

Step 3
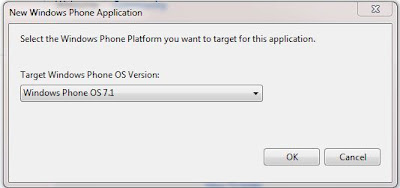
Select the Window Phone Platform,it is look like this


Click on Image for better View

Step 4
Now design page of sending SMS,it is look like this
<Grid x:Name="LayoutRoot" Background="Transparent">
        <Grid.RowDefinitions>
            <RowDefinition Height="Auto"/>
            <RowDefinition Height="*"/>
        </Grid.RowDefinitions>

        <!--TitlePanel contains the name of the application and page title-->
        <StackPanel x:Name="TitlePanel" Grid.Row="0" Margin="12,17,0,28">
            <TextBlock x:Name="ApplicationTitle" Text="MY APPLICATION" Style="{StaticResource PhoneTextNormalStyle}"/>
            <TextBlock x:Name="PageTitle" Text="Send SMS" Margin="9,-7,0,0" Style="{StaticResource PhoneTextTitle1Style}"/>
        </StackPanel>

        <!--ContentPanel - place additional content here-->
        <Grid x:Name="ContentPanel" Grid.Row="1" Margin="12,0,12,0">
         <Grid.RowDefinitions>
          <RowDefinition Height="0.072*"/>
          <RowDefinition Height="0.124*"/>
    <RowDefinition Height="0.066*"/>
          <RowDefinition Height="0.61*"/>
          <RowDefinition Height="0.129*"/>
         </Grid.RowDefinitions>
   
   <TextBlock Grid.Row="0" Grid.Column="0" Text="Enter Mobile No" FontSize="24"/>
   <TextBox x:Name="txtMobileNo" Grid.Row="1" Grid.Column="0"></TextBox>
   <TextBlock Grid.Row="2" Grid.Column="0" Text="Enter Message" FontSize="24"></TextBlock>
   <TextBox x:Name="txtMessage" Grid.Row="3" Grid.Column="0" TextWrapping="Wrap" AcceptsReturn="True"></TextBox>
   <Button x:Name="btnSendSMS" Grid.Row="4" Grid.Column="0" Content="Send SMS" Click="btnSendSMS_Click"></Button>
   
   </Grid>
    </Grid>


Click on Image for better View

Step 5
On Button Send SMS click event,add the following Code,it is look like this
private void btnSendSMS_Click(object sender, RoutedEventArgs e)
        {
            try
            {
                //Create Instance of SmsComposeTask Launcher
                SmsComposeTask smsComposeTask = new SmsComposeTask();

                // Specify Mobile phone number to whom the sms is to be sent
                smsComposeTask.To = txtMobileNo.Text.Trim();

                // Body of Message
                smsComposeTask.Body = txtMessage.Text.Trim();

                //Invoke the native sms edtior
                smsComposeTask.Show(); 
            }
            catch (Exception ex)
            {
                MessageBox.Show(ex.Message); 
            }

        }

Run the Project.

Output


Click on Image for better View

When we click on send SMS button, it will open native SMS application.


Click on Image for better View
In here we can either edit the message or set other recipients.
Once the user clicks on Send Button on native SMS application, SMS will be sent.


Click on Image for better View

Full Code of XAML
<phone:PhoneApplicationPage 
    x:Class="SendSMSinWP7.MainPage"
    xmlns="http://schemas.microsoft.com/winfx/2006/xaml/presentation"
    xmlns:x="http://schemas.microsoft.com/winfx/2006/xaml"
    xmlns:phone="clr-namespace:Microsoft.Phone.Controls;assembly=Microsoft.Phone"
    xmlns:shell="clr-namespace:Microsoft.Phone.Shell;assembly=Microsoft.Phone"
    xmlns:d="http://schemas.microsoft.com/expression/blend/2008"
    xmlns:mc="http://schemas.openxmlformats.org/markup-compatibility/2006"
    mc:Ignorable="d" d:DesignWidth="480" d:DesignHeight="768"
    FontFamily="{StaticResource PhoneFontFamilyNormal}"
    FontSize="{StaticResource PhoneFontSizeNormal}"
    Foreground="{StaticResource PhoneForegroundBrush}"
    SupportedOrientations="Portrait" Orientation="Portrait"
    shell:SystemTray.IsVisible="True">

    <!--LayoutRoot is the root grid where all page content is placed-->
    <Grid x:Name="LayoutRoot" Background="Transparent">
        <Grid.RowDefinitions>
            <RowDefinition Height="Auto"/>
            <RowDefinition Height="*"/>
        </Grid.RowDefinitions>

        <!--TitlePanel contains the name of the application and page title-->
        <StackPanel x:Name="TitlePanel" Grid.Row="0" Margin="12,17,0,28">
            <TextBlock x:Name="ApplicationTitle" Text="MY APPLICATION" Style="{StaticResource PhoneTextNormalStyle}"/>
            <TextBlock x:Name="PageTitle" Text="Send SMS" Margin="9,-7,0,0" Style="{StaticResource PhoneTextTitle1Style}"/>
        </StackPanel>

        <!--ContentPanel - place additional content here-->
        <Grid x:Name="ContentPanel" Grid.Row="1" Margin="12,0,12,0">
         <Grid.RowDefinitions>
          <RowDefinition Height="0.072*"/>
          <RowDefinition Height="0.124*"/>
    <RowDefinition Height="0.066*"/>
          <RowDefinition Height="0.61*"/>
          <RowDefinition Height="0.129*"/>
         </Grid.RowDefinitions>
   
   <TextBlock Grid.Row="0" Grid.Column="0" Text="Enter Mobile No" FontSize="24"/>
   <TextBox x:Name="txtMobileNo" Grid.Row="1" Grid.Column="0"></TextBox>
   <TextBlock Grid.Row="2" Grid.Column="0" Text="Enter Message" FontSize="24"></TextBlock>
   <TextBox x:Name="txtMessage" Grid.Row="3" Grid.Column="0" TextWrapping="Wrap" AcceptsReturn="True"></TextBox>
   <Button x:Name="btnSendSMS" Grid.Row="4" Grid.Column="0" Content="Send SMS" Click="btnSendSMS_Click"></Button>
   
   </Grid>
    </Grid>
 
    <!--Sample code showing usage of ApplicationBar-->
    <!--<phone:PhoneApplicationPage.ApplicationBar>
        <shell:ApplicationBar IsVisible="True" IsMenuEnabled="True">
            <shell:ApplicationBarIconButton IconUri="/Images/appbar_button1.png" Text="Button 1"/>
            <shell:ApplicationBarIconButton IconUri="/Images/appbar_button2.png" Text="Button 2"/>
            <shell:ApplicationBar.MenuItems>
                <shell:ApplicationBarMenuItem Text="MenuItem 1"/>
                <shell:ApplicationBarMenuItem Text="MenuItem 2"/>
            </shell:ApplicationBar.MenuItems>
        </shell:ApplicationBar>
    </phone:PhoneApplicationPage.ApplicationBar>-->

</phone:PhoneApplicationPage>


Download
Download Source Code

Friday, November 23, 2012

JQuery - Custom Autocomplete TextBox in JQuery

In this article i will explain how to display Image with Auto Complete search in Asp.net Using JQuery.

here we can use our own custom data formats and displays by simply overriding the default focus and select actions.

Declare web methods in Code behind and call those methods in our page using JQuery.

Step 1
Download UI Autocomplete Plugin from the following Link
JQuery UI 1.9.2 

Step 2
First we need to create a database,give the database name as AppTest and create a single table such as Developer, where we can store developer information.,it is look like this
USE AppTest

CREATE TABLE Developer
(
 Name Nvarchar(50) NULL,
 Speciality Nvarchar(50) NULL,
 [Image] Nvarchar(50) NULL
)


Click on Image for better View

Step 3
Insert a Data in Developer table,it is look like this
INSERT INTO Developer 
(Name,Speciality,Image)
VALUES
('Bhushan Pawar','SEO & Sql Database','Bhushan.jpg')

INSERT INTO Developer 
(Name,Speciality,Image)
VALUES
('Ramdas Bhosale','Web Application','Ramdas.jpg')

INSERT INTO Developer 
(Name,Speciality,Image)
VALUES
('Kishor Naik','Window Application','Kishor.jpg')


Click on Image for better View

Step 4
Create a Web Application and give the solution name as SolCustomAutoCompleteBoxJquery.

Step 5
Add CSS and Script files which we downloaded from Above Link,it is look like this

CSS

SCRIPT

Click on Image for better View

Step 6
Add images in Folder,Create a New Folder in the Solution and give folder name as Images,it is look like this


Click on Image for better View

Step 7
Add App_Code folder in the solution and add a New Folder inside the App_Code folder and give folder name as ORD,it is look like this


Click on Image for better View

Step 8
Add a Linq to Sql class,Select the ORD folder,right click on Add new Item,select LINQ to SQL classes from installed Visual Studio templates and name it DeveloperDC and click on add button,it is look like this


Click on Image for better View

Step 9
Open a O/R Designer by double click on DeveloperDC.dbml,it is look like this


Click on Image for better View


Click on Image for better View

Visual stdio provides an object-relational mapping designer,called the O/R Designer which allows you to visually design the object to database mapping.

Step 10
Create a Developer object that will use LINQ to SQL to map to this table.go to the Server Explorer,select AppTest database,go to the Tables and select Developer table,it is look like this


Click on Image for better View

Drag and drop Developer table from Server explorer onto the design surface of the O/R Designer,it is look like this


Click on Image for better View

Step 11
Create a Developer static class in App_Code folder for retriving an Developer data from database,it is look like this
using System;
using System.Collections.Generic;
using System.Linq;
using System.Web;

/// <summary>
/// Summary description for Developer
/// </summary>
public static class Developer
{
    #region Methods

    /// <summary>
    /// Retriving Developer Data from Table
    /// </summary>
    /// <param name="SearchText">Specify the Search text</param>
    /// <returns>List</returns>
    public static List<ORD.Developer> GetdeveloperData(String SearchText)
    {
        try
        {
            ORD.DeveloperDCDataContext DC = new ORD.DeveloperDCDataContext();

            // Using Linq
            var Query = (from Q in DC.Developers
                         where Q.Name.Contains(SearchText)
                         select Q).ToList<ORD.Developer>();

            // Using Lambda Expression
            //var Query = DC.Developers.Where(LE => LE.Name.Contains(SearchText)).Select(LE => LE).ToList<ORD.Developer>();

            return Query; 
        }
        catch (Exception ex)
        {
            throw new Exception(ex.Message); 
        }
    }

    #endregion
}


Step 12
Create a Web Method in Default.aspx.cs for call Web Method from JSON function.it is look like this
using System;
using System.Collections.Generic;
using System.Linq;
using System.Web;
using System.Web.Services;
using System.Web.UI;
using System.Web.UI.WebControls;

public partial class _Default : System.Web.UI.Page 
{
    protected void Page_Load(object sender, EventArgs e)
    {
       
    }

    #region Methods

    /// <summary>
    /// Bind Data
    /// </summary>
    /// <param name="SearchText">Specify the Search Text Box</param>
    /// <returns>Array of ORD.Developer</returns>
    [WebMethod]
    public static ORD.Developer[] BindAutoCompleteBox(String SearchText)
    {
        try
        {
            List<ORD.Developer> List = Developer.GetdeveloperData(SearchText);

            return List.ToArray();
        }
        catch (Exception ex)
        {
            throw new Exception(ex.Message); 
        }
    }

    #endregion
}

Generally we will create static web methods in webservice and we will use those methods to call it from JQuery instead of that directly we can create static methods with [WebMethod] attribute in our code behind file and use those methods from JQuery.

Now Server side code part done,let move to the Client Side.

Step 13
 Add a TextBox in Page,it is look like this
<body>
    <form id="form1" runat="server">
        <div>
            <asp:TextBox ID="txtSearch" runat="server"></asp:TextBox>
        </div>
    </form>
</body>


Step 14
Add CSS file Reference inside the head tag of the page,it is look like this
<link type="text/css" href="css/ui-lightness/jquery-ui-1.9.2.custom.min.css" rel="Stylesheet" rev="Stylesheet" />

Step 15
Add JQuery and UI file Reference inside the head tag of the page,it is look like this
<script language="javascript" type="text/javascript" src="Scripts/jquery-1.8.3.js"></script>
    <script language="javascript" type="text/javascript" src="Scripts/jquery-ui-1.9.2.custom.min.js"></script>

Step 16
Call a Page Web Method in JQuery for binding Custom Data,it is look like this
<script language="javascript" type="text/javascript">

        $(document).ready(function () {

            $('#<%=txtSearch.ClientID %>').autocomplete({
                minLength: 0,
                source: function (request, response) {
                    $.ajax({
                        type: "POST",
                        contentType: "application/json; charset=utf-8",
                        // Specify the Full Path of Page and Exact Fucntion Name 
                        url: "Default.aspx/BindAutoCompleteBox",
                        // Specify the Exact Parameter Name which you specified in Function 
                        data: "{'SearchText':'" + $('#<%=txtSearch.ClientID %>').val() + "'}",
                                    dataType: "json",
                                    success: function (data) {
                                        response(data.d);
                                    },
                                    error: function (result) {
                                        alert("Issued in Database.");
                                    }
                                });
                },
                //Triggered when focus is moved to an item
                focus: function (event, ui) {
                    $("#txtSearch").val(ui.item.Name);
                    return false;
                },
                //Triggered when an item is selected from the menu.
                select: function (event, ui) {
                    $("#txtSearch").val(ui.item.Name);
                    return false;
                },

                // Create a Custome Format to dispaly Data in TextBox
            }).data('autocomplete')._renderItem = function (ul, item) {
                return $("<li></li>")
                        .data("item.autocomplete", item)
                        .append("<a style = 'vertical-align:top'>" +
                        "<img style = 'vertical-align:middle;width:60px;height:60px' src='Images/" + item.Image + "'/>" +
                        "Developer Name :" + item.Name +
                        "<br/>"+
                        "Speciality :" + item.Speciality +
                        "<hr/>" +
                        "</a>"
                        ).appendTo(ul);
            };
           

        });

    </script>

This is the function declaration of JSON format we are using this JSON function to call web methods using JQuery $.ajax() whenever we need to make Ajax call with JQuery then we will use JSON functions like as we mentioned in above format. Here type, ContentType  are same for all functions only dataType, url, data and success and error parameters will vary based on our requirement.


  • Path : Path of our WebMethod.
  • data : Pass Parameter.
  • success : Once our web method execution completed then success function will execute and return required data.
  • error : This parameter is used to display required error message whenever we get problem.

  • Focus Event : 
    • Triggered when focus is moved to an item (not selecting). The default action is to replace the text field's value with the value of the focused item, though only if the event was triggered by a keyboard interaction.
    • Canceling this event prevents the value from being updated, but does not prevent the menu item from being focused.
  • Select Event :
    • Triggered when an item is selected from the menu. The default action is to replace the text field's value with the value of the selected item.u. The default action is to replace the text field's value with the value of the selected item.
    • Canceling this event prevents the value from being updated, but does not prevent the menu from closing.

  • Data : Create Custom Format to display data. 


Full Code of .ASPX
<%@ Page Language="C#" AutoEventWireup="true"  CodeFile="Default.aspx.cs" Inherits="_Default" %>

<!DOCTYPE html PUBLIC "-//W3C//DTD XHTML 1.0 Transitional//EN" "http://www.w3.org/TR/xhtml1/DTD/xhtml1-transitional.dtd">

<html xmlns="http://www.w3.org/1999/xhtml">
<head runat="server">
    <title>Custom AutoCompleteTextBox in Jquery</title>

    <link type="text/css" href="css/ui-lightness/jquery-ui-1.9.2.custom.min.css" rel="Stylesheet" rev="Stylesheet" />

    <script language="javascript" type="text/javascript" src="Scripts/jquery-1.8.3.js"></script>
    <script language="javascript" type="text/javascript" src="Scripts/jquery-ui-1.9.2.custom.min.js"></script>

    <script language="javascript" type="text/javascript">

        $(document).ready(function () {

            $('#<%=txtSearch.ClientID %>').autocomplete({
                minLength: 0,
                source: function (request, response) {
                    $.ajax({
                        type: "POST",
                        contentType: "application/json; charset=utf-8",
                        // Specify the Full Path of Page and Exact Fucntion Name 
                        url: "Default.aspx/BindAutoCompleteBox",
                        // Specify the Exact Parameter Name which you specified in Function 
                        data: "{'SearchText':'" + $('#<%=txtSearch.ClientID %>').val() + "'}",
                                    dataType: "json",
                                    success: function (data) {
                                        response(data.d);
                                    },
                                    error: function (result) {
                                        alert("Issued in Database.");
                                    }
                                });
                },
                //Triggered when focus is moved to an item
                focus: function (event, ui) {
                    $("#txtSearch").val(ui.item.Name);
                    return false;
                },
                //Triggered when an item is selected from the menu.
                select: function (event, ui) {
                    $("#txtSearch").val(ui.item.Name);
                    return false;
                },

                // Create a Custome Format to dispaly Data in TextBox
            }).data('autocomplete')._renderItem = function (ul, item) {
                return $("<li></li>")
                        .data("item.autocomplete", item)
                        .append("<a style = 'vertical-align:top'>" +
                        "<img style = 'vertical-align:middle;width:60px;height:60px' src='Images/" + item.Image + "'/>" +
                        "Developer Name :" + item.Name +
                        "<br/>"+
                        "Speciality :" + item.Speciality +
                        "<hr/>" +
                        "</a>"
                        ).appendTo(ul);
            };
           

        });

    </script>

</head>
<body>
    <form id="form1" runat="server">
        <div>
            <asp:TextBox ID="txtSearch" runat="server"></asp:TextBox>
        </div>
    </form>
</body>
</html>

Output


Download
Download Source Code

Tuesday, November 20, 2012

Silverlight - File Upload in Silverlight 4

In this article, i will show you how to upload file in silverlight 4 application. Uploading file is silverlight is not easy.There is no way to upload file on silverlight the way do in ASP.net.

Let see how to upload file in silverlight Application.

Step 1
Create a Silverlight application and give the solution name as SolFileUploadinSilverlight.
Select Web Project Type as ASP.NET Web site and Select Silverlight 4 version.

Step 2
Select ASP.net Web project(SolFileUploadinSilverlight.Web) and right click on web project,select Add new Folder in solution and give folder name as Images.

Step 3
On MainPage.xaml,add a button and two TextBlock control on page,it is look ike this


<UserControl x:Class="SolFileUploadinSilverlight.MainPage"
    xmlns="http://schemas.microsoft.com/winfx/2006/xaml/presentation"
    xmlns:x="http://schemas.microsoft.com/winfx/2006/xaml"
    xmlns:d="http://schemas.microsoft.com/expression/blend/2008"
    xmlns:mc="http://schemas.openxmlformats.org/markup-compatibility/2006"
    mc:Ignorable="d"
    d:DesignHeight="300" d:DesignWidth="400">

    <Grid x:Name="LayoutRoot" Background="White">
        <Grid.RowDefinitions>
            <RowDefinition/>
            <RowDefinition/>
            <RowDefinition/>
            <RowDefinition Height="12*"/>
        </Grid.RowDefinitions>
        
        <Button x:Name="btnupload" Grid.Row="0" Grid.Column="0" Width="200" Content="Upload File" HorizontalAlignment="Left" Click="btnupload_Click"></Button>
        <TextBlock x:Name="tbFileName" Grid.Row="1" Grid.Column="0" HorizontalAlignment="Left" VerticalAlignment="Center"></TextBlock>
        <TextBlock x:Name="tbStatus" Grid.Row="2" Grid.Column="0" HorizontalAlignment="Left" VerticalAlignment="Center"></TextBlock>
        
    </Grid>
</UserControl>


Click on image for better view

Step 4
Design Part done,now we turn on functionality part,The Idea is very simple to get file to upload from User,convert Data into stream and send to generic handler.generic handler receives that stream and writes the content to the file on the server.

On Code behind of MainPage.xaml,write a ReadWriteStream function,it is look like this 
/// <summary>
        /// Read and Write Stream of given file.
        /// </summary>
        /// <param name="Input"></param>
        /// <param name="Output"></param>
        private void ReadWriteStream(Stream Input, Stream Output)
        {
            try
            {
                byte[] ByteBufferObj = new byte[4096];
                int BytesRead = 0;

                while ((BytesRead = Input.Read(ByteBufferObj, 0, ByteBufferObj.Length)) != 0)
                {
                    Output.Write(ByteBufferObj, 0, BytesRead);
                }
            }
            catch (Exception ex)
            {
                throw new Exception(ex.Message);
            }
            finally
            {
                Input.Close();
                Output.Close();
            }
        }


In this code block we are reading the selected file in the stream and writing to the output stream. here we are creating a array of bytes with size of 4096 for uploading file in the server.if we want to upload bigger size of file then change the array of size.

Step 5
Write a UploadFile function,it is look like this
/// <summary>
        ///  Send Stream Data to the Generic handler.
        /// </summary>
        /// <param name="FileName"></param>
        /// <param name="StreamData"></param>
        /// <returns></returns>
        private Boolean UploadFile(String FileName, Stream StreamData)
        {
            Boolean Flag = false;
            try
            {
                
                Uri URIObj = Application.Current.Host.Source;

                
                UriBuilder UriBuilderObj = new System.UriBuilder(URIObj.Scheme, URIObj.Host, URIObj.Port, "FileUploadHandler.ashx");
                UriBuilderObj.Query = String.Format("FileName={0}", FileName);

                WebClient WebClientObj = new WebClient();

                WebClientObj.OpenWriteCompleted += (Sender, E) =>
                {
                    try
                    {
                        // call ReadWriteStream function
                        ReadWriteStream(StreamData, E.Result);
                    }
                    catch (Exception ex)
                    {
                        throw new Exception(ex.Message);
                    }
                    finally
                    {
                        E.Result.Close();
                        StreamData.Close();
                    }
                };

                WebClientObj.OpenWriteAsync(UriBuilderObj.Uri);

                Flag = true;
            }
            catch (Exception ex)
            {
                throw new Exception(ex.Message);
            }

            return Flag;
        }


In this Code Block,we are concat the URI of the .ashx,with name of Selected file Name.Handled the OpenWriteCompleted event and using lamda expression defining the code that runs when this event fires.We are calling OpenWriteAsync method by passing the uri of the generic handler (.ashx) that actually opens and starts writing data to the handler and when it completes the OpenWriteCompleted event fires and start writing the selected file to the output stream(Call ReadWrite function in OpenWriteCompleted Event). This method calls the generic handler because of Uri into OpenWriteAsync method. 

Step 6
Write a GetFile function,it is look like this
/// <summary>
        /// get selected file from user and upload to the server.
        /// </summary>
        private void GetFile()
        {
            Boolean? IsOpen = false;
            try
            {
                OpenFileDialog OFDobj = new OpenFileDialog();
                OFDobj.Filter = "All files (*.*)|*.*|JPG Images (*.jpg)|*.jpg";
                OFDobj.Multiselect = false;

                IsOpen = OFDobj.ShowDialog();

                if (IsOpen == true)
                {
                    try
                    {
                        if (UploadFile(OFDobj.File.Name, OFDobj.File.OpenRead()))
                        {
                            tbFileName.Text = OFDobj.File.Name;
                            tbFileName.Foreground = new SolidColorBrush(Colors.Green);

                            tbStatus.Text = "File Upload Sucessfully";
                            tbStatus.Foreground = new SolidColorBrush(Colors.Green);
                        }
                        else
                        {
                            tbStatus.Text = "Error Occurred on file uploading";
                            tbStatus.Foreground = new SolidColorBrush(Colors.Red);
                        }
                    }
                    catch(Exception)
                    {
                         tbStatus.Text = "Error Occurred on file uploading";
                         tbStatus.Foreground = new SolidColorBrush(Colors.Red);
                    }
                }
                else
                {
                    tbStatus.Text = "Select File for Uploding file";
                    tbStatus.Foreground = new SolidColorBrush(Colors.Red);
                }
            }
            catch (Exception ex)
            {
                throw new Exception(ex.Message); 
            }
        }


In this Code block,we have used OpenFileDialog class to open the selected file dialog box and call UploadFile Function to send Data to the Generic Handler.

Step 7
Call GetFile Function on Button Upload Click event,it is look like this

private void btnupload_Click(object sender, RoutedEventArgs e)
        {
            try
            {
                GetFile();
            }
            catch (Exception ex)
            {
                MessageBox.Show(ex.Message);  
            }
        }


Full Code Behind of MainPage
using System;
using System.Collections.Generic;
using System.IO;
using System.Linq;
using System.Net;
using System.Windows;
using System.Windows.Controls;
using System.Windows.Documents;
using System.Windows.Input;
using System.Windows.Media;
using System.Windows.Media.Animation;
using System.Windows.Shapes;

namespace SolFileUploadinSilverlight
{
    public partial class MainPage : UserControl
    {
        public MainPage()
        {
            InitializeComponent();

        }

        #region Methods

        /// <summary>
        /// Read and Write Stream of given file.
        /// </summary>
        /// <param name="Input"></param>
        /// <param name="Output"></param>
        private void ReadWriteStream(Stream Input, Stream Output)
        {
            try
            {
                byte[] ByteBufferObj = new byte[4096];
                int BytesRead = 0;

                while ((BytesRead = Input.Read(ByteBufferObj, 0, ByteBufferObj.Length)) != 0)
                {
                    Output.Write(ByteBufferObj, 0, BytesRead);
                }
            }
            catch (Exception ex)
            {
                throw new Exception(ex.Message);
            }
            finally
            {
                Input.Close();
                Output.Close();
            }
        }

        /// <summary>
        ///  Send Stream Data to the Generic handler.
        /// </summary>
        /// <param name="FileName"></param>
        /// <param name="StreamData"></param>
        /// <returns></returns>
        private Boolean UploadFile(String FileName, Stream StreamData)
        {
            Boolean Flag = false;
            try
            {
                
                Uri URIObj = Application.Current.Host.Source;

                
                UriBuilder UriBuilderObj = new System.UriBuilder(URIObj.Scheme, URIObj.Host, URIObj.Port, "FileUploadHandler.ashx");
                UriBuilderObj.Query = String.Format("FileName={0}", FileName);

                WebClient WebClientObj = new WebClient();

                WebClientObj.OpenWriteCompleted += (Sender, E) =>
                {
                    try
                    {
                        // call ReadWriteStream function
                        ReadWriteStream(StreamData, E.Result);
                    }
                    catch (Exception ex)
                    {
                        throw new Exception(ex.Message);
                    }
                    finally
                    {
                        E.Result.Close();
                        StreamData.Close();
                    }
                };

                WebClientObj.OpenWriteAsync(UriBuilderObj.Uri);

                Flag = true;
            }
            catch (Exception ex)
            {
                throw new Exception(ex.Message);
            }

            return Flag;
        }

        /// <summary>
        /// get selected file from user and upload to the server.
        /// </summary>
        private void GetFile()
        {
            Boolean? IsOpen = false;
            try
            {
                OpenFileDialog OFDobj = new OpenFileDialog();
                OFDobj.Filter = "All files (*.*)|*.*|JPG Images (*.jpg)|*.jpg";
                OFDobj.Multiselect = false;

                IsOpen = OFDobj.ShowDialog();

                if (IsOpen == true)
                {
                    try
                    {
                        if (UploadFile(OFDobj.File.Name, OFDobj.File.OpenRead()))
                        {
                            tbFileName.Text = OFDobj.File.Name;
                            tbFileName.Foreground = new SolidColorBrush(Colors.Green);

                            tbStatus.Text = "File Upload Sucessfully";
                            tbStatus.Foreground = new SolidColorBrush(Colors.Green);
                        }
                        else
                        {
                            tbStatus.Text = "Error Occurred on file uploading";
                            tbStatus.Foreground = new SolidColorBrush(Colors.Red);
                        }
                    }
                    catch(Exception)
                    {
                         tbStatus.Text = "Error Occurred on file uploading";
                         tbStatus.Foreground = new SolidColorBrush(Colors.Red);
                    }
                }
                else
                {
                    tbStatus.Text = "Select File for Uploding file";
                    tbStatus.Foreground = new SolidColorBrush(Colors.Red);
                }
            }
            catch (Exception ex)
            {
                throw new Exception(ex.Message); 
            }
        }

        #endregion

        private void btnupload_Click(object sender, RoutedEventArgs e)
        {
            try
            {
                GetFile();
            }
            catch (Exception ex)
            {
                MessageBox.Show(ex.Message);  
            }
        }

       
    }
}


Step 8
Now Create a Generic Handler in ASP.net Web project(SolFileUploadinSilverlight.Web),Select SolFileUploadinSilverlight.Web Solution,Right Click on Solution,Select Add new Item  from Context menu,Select Generic Handler from Template and Rename the file name as FileUploadHandler.ashx,Click on Add button,it is look like this


Click on image for better view

Step 9
In Generic handler, write SaveFileInServer function,it is look like this 
/// <summary>
    /// Save file in Images Folder
    /// </summary>
    /// <param name="StreamObj"></param>
    /// <param name="FsObj"></param>
    private void SaveFileInServer(Stream StreamObj, FileStream FsObj)
    {
        try
        {
            byte[] ByteBufferObj = new byte[4096];
            int BytesRead = 0;

            while ((BytesRead = StreamObj.Read(ByteBufferObj, 0, ByteBufferObj.Length)) != 0)
            {
                FsObj.Write(ByteBufferObj, 0, BytesRead);
            }
        }
        catch (Exception ex)
        {
            throw new Exception(ex.Message);
        }
        finally
        {
            StreamObj.Close();
            FsObj.Close();
        }
    }


In this Code Block,We are reading the input steam into array of bytes and writing to the file.

Step 10
On ProcessRequest function,write a below code,it is look like this
public void ProcessRequest (HttpContext context) {

        try
        {
            String FileName = context.Request.QueryString["FileName"].ToString();

            if (FileName != String.Empty)
            {
                FileStream FSobj = File.Create(context.Server.MapPath("~/Images/" + FileName));

                SaveFileInServer(context.Request.InputStream, FSobj);
            }
        }
        catch (Exception ex)
        {
            throw new Exception(ex.Message); 
        }
        
    }


In this Code block,we are first retrieving the file name being passed from the querystring.we are using FileStream to create a file based on the file name being passed here and call SavefileInServer function.

Note:

  • We are also passing the folder name – Images where our files gets uploaded.
  • we must have write permission to this folder.

Full Code of Generic Handler
<%@ WebHandler Language="C#" Class="FileUploadHandler" %>

using System;
using System.Web;
using System.IO;

public class FileUploadHandler : IHttpHandler {
    
    public void ProcessRequest (HttpContext context) {

        try
        {
            String FileName = context.Request.QueryString["FileName"].ToString();

            if (FileName != String.Empty)
            {
                FileStream FSobj = File.Create(context.Server.MapPath("~/Images/" + FileName));

                SaveFileInServer(context.Request.InputStream, FSobj);
            }
        }
        catch (Exception ex)
        {
            throw new Exception(ex.Message); 
        }
        
    }

    #region Methods

    /// <summary>
    /// Save file in Images Folder
    /// </summary>
    /// <param name="StreamObj"></param>
    /// <param name="FsObj"></param>
    private void SaveFileInServer(Stream StreamObj, FileStream FsObj)
    {
        try
        {
            byte[] ByteBufferObj = new byte[4096];
            int BytesRead = 0;

            while ((BytesRead = StreamObj.Read(ByteBufferObj, 0, ByteBufferObj.Length)) != 0)
            {
                FsObj.Write(ByteBufferObj, 0, BytesRead);
            }
        }
        catch (Exception ex)
        {
            throw new Exception(ex.Message);
        }
        finally
        {
            StreamObj.Close();
            FsObj.Close();
        }
    }
    
    #endregion

    public bool IsReusable {
        get {
            return false;
        }
    }

}


Run the project.

Output


Download
Download Source Code

Saturday, November 17, 2012

Asp.net - Google Map V3 Directions in Asp.net

In this article i will show you how to provide direction for any given locations on google map in ASP.net.

In this Example not only handles display of the polyline and any associated markers, but also can handle the textual display of directions as a series of steps. 

Let See how to bind Direction routes in Google Map.

Step 1
Download JQuery Script from the following Link
JQuery 1.8.2 

Step 2
Create a Web Application and give the Solution name as SolGoogleMap_Directions.

Step 3
First we need to design a page,it is look like this 
<body>
    <form id="form1" runat="server">
    <div>
        <table border="0" cellspacing="5" cellpadding="5" align="center" width="100%">
            <tr>
                <td style="width: 20%" align="center" valign="middle">From</td>
                <td style="width: 80%">
                    <asp:TextBox ID="txtFrom" runat="server" Width="400px"></asp:TextBox>
                </td>
            </tr>
            <tr>
                <td style="width: 20%" align="center" valign="middle">To</td>
                <td style="width: 80%">
                    <asp:TextBox ID="txtTo" runat="server" Width="400px"></asp:TextBox>
                </td>
            </tr>
            <tr>
                <td style="width: 20%">
                    
                </td>
                <td style="width: 80%">
                    <asp:Button ID="btnDirections" runat="server" Text="Direction" Width="200px"/>
                </td>
            </tr>
            <tr>
                <td colspan="2" style="height:100%">

                    <table border="0" cellspacing="2" cellpadding="2" align="center" width="100%">
                        <tr>
                            <td style="width:40%">
                                <div id ="DivDirectionRouteStatus" style="height:480px;overflow: auto"></div>
                            </td>
                            <td style="width:60%">
                                 <div id ="DivGoogleMapCanvas"  style="height:480px;"></div>
                            </td>
                        </tr>
                    </table>

                </td>
            </tr>
        </table>
    </div>
    </form>
</body>


Click on Image for better view

Step 4
Add jQuery file Reference inside the head tag of the page,it is look like this
<script language="javascript" type="text/javascript" src="Scripts/jquery-1.8.2.min.js"></script>


Step 5
We need to add Google Map V3 API reference in head tag,it is look like this
<script language="javascript" type="text/javascript" src="http://maps.google.com/maps/api/js?sensor=false&libraries=places&language=en-AU"></script>


Step 6
Bind Location to the text boxes,here we have use google API to have an autocomplete for location,it is look like this  

<script language="javascript" type="text/javascript">

          $(document).ready(function () {

              try
              {
                  var FromAutoComplete = new google.maps.places.Autocomplete($("#txtFrom")[0], {});
                  var ToAutoComplete = new google.maps.places.Autocomplete($("#txtTo")[0], {});

                  google.maps.event.addListener(FromAutoComplete, 'place_changed', function () {
                      var place = FromAutoComplete.getPlace();
                  });

                  google.maps.event.addListener(ToAutoComplete, 'place_changed', function () {
                      var place = ToAutoComplete.getPlace();
                  });
              }
              catch (E)
              {
                  alert(E.message);
              }

             
          });

      </script>


From Location 

To Location

Click on Image for better view

Step 7

Now Initialize Google Map on body onload event,it is look like this.First write script to initialize Google map. 
<script language="javascript" type="text/javascript">

            var DirectionsDisplay;
            var DirectionsService = new google.maps.DirectionsService();

            function InitializeGoogleMap() {

                try
                {
                    DirectionsDisplay = new google.maps.DirectionsRenderer();
                    var LatitudeLongitude = new google.maps.LatLng(19.1969813, 72.9962491);
                    var GoogleMapOptions =
                    {
                        zoom: 10,
                        center: LatitudeLongitude,
                        mapTypeId: google.maps.MapTypeId.ROADMAP
                    };
                    var map = new google.maps.Map($("#DivGoogleMapCanvas")[0], GoogleMapOptions);

                    DirectionsDisplay.setMap(map);
                    DirectionsDisplay.setPanel($("#DivDirectionRouteStatus")[0]);
                }
                catch (E)
                {
                    alert(E.message);
                }


            }

 </script>


Then call InitializeGoogleMap function on body onload event,it is look like this
<body onload="InitializeGoogleMap(); return false">


Click on Image for better view

Step 8
Display Direction routes from given location,it is look like this
function GetDirectionRoute() {

                try
                {
                    if ($("#txtFrom").val().length != 0 && $("#txtTo").val().length != 0) {
                    
                        var From =$("#txtFrom").val();
                        var To = $("#txtTo").val();
                        var Request = {
                            origin: From,
                            destination: To,
                            travelMode: google.maps.DirectionsTravelMode.DRIVING
                        };
                        DirectionsService.route(Request, function (response, status) {
                            if (status == google.maps.DirectionsStatus.OK) {
                                DirectionsDisplay.setDirections(response);
                            }
                        });
                    }
                    else {
                        if ($("#txtFrom").val().length == 0) {
                            alert("Enter From Location");
                        }
                        else if ($("#txtTo").val().length == 0) {
                            alert("Enter To Location");
                        }
                    }
                }
                catch (E)
                {
                    alert(E.message);
                }

            }


Then call GetDirectionRoute function on btnDirections onclientclick event,it is look like this


Full Code
<%@ Page Language="C#" AutoEventWireup="true"  CodeFile="Default.aspx.cs" Inherits="_Default" %>

<!DOCTYPE html PUBLIC "-//W3C//DTD XHTML 1.0 Transitional//EN" "http://www.w3.org/TR/xhtml1/DTD/xhtml1-transitional.dtd">

<html xmlns="http://www.w3.org/1999/xhtml">
<head runat="server">
    <title>Google Map Version 3 Directions</title>

    <script language="javascript" type="text/javascript" src="Scripts/jquery-1.8.2.min.js"></script>

     <script language="javascript" type="text/javascript" src="http://maps.google.com/maps/api/js?sensor=false&libraries=places&language=en-AU"></script>
        
      <script language="javascript" type="text/javascript">

          $(document).ready(function () {

              try
              {
                  var FromAutoComplete = new google.maps.places.Autocomplete($("#txtFrom")[0], {});
                  var ToAutoComplete = new google.maps.places.Autocomplete($("#txtTo")[0], {});

                  google.maps.event.addListener(FromAutoComplete, 'place_changed', function () {
                      var place = FromAutoComplete.getPlace();
                  });

                  google.maps.event.addListener(ToAutoComplete, 'place_changed', function () {
                      var place = ToAutoComplete.getPlace();
                  });
              }
              catch (E)
              {
                  alert(E.message);
              }

             
          });

      </script>

      <script language="javascript" type="text/javascript">

            var DirectionsDisplay;
            var DirectionsService = new google.maps.DirectionsService();

            function InitializeGoogleMap() {

                try
                {
                    DirectionsDisplay = new google.maps.DirectionsRenderer();
                    var LatitudeLongitude = new google.maps.LatLng(19.1969813, 72.9962491);
                    var GoogleMapOptions =
                    {
                        zoom: 10,
                        center: LatitudeLongitude,
                        mapTypeId: google.maps.MapTypeId.ROADMAP
                    };
                    var map = new google.maps.Map($("#DivGoogleMapCanvas")[0], GoogleMapOptions);

                    DirectionsDisplay.setMap(map);
                    DirectionsDisplay.setPanel($("#DivDirectionRouteStatus")[0]);
                }
                catch (E)
                {
                    alert(E.message);
                }


            }

            function GetDirectionRoute() {

                try
                {
                    if ($("#txtFrom").val().length != 0 && $("#txtTo").val().length != 0) {
                    
                        var From =$("#txtFrom").val();
                        var To = $("#txtTo").val();
                        var Request = {
                            origin: From,
                            destination: To,
                            travelMode: google.maps.DirectionsTravelMode.DRIVING
                        };
                        DirectionsService.route(Request, function (response, status) {
                            if (status == google.maps.DirectionsStatus.OK) {
                                DirectionsDisplay.setDirections(response);
                            }
                        });
                    }
                    else {
                        if ($("#txtFrom").val().length == 0) {
                            alert("Enter From Location");
                        }
                        else if ($("#txtTo").val().length == 0) {
                            alert("Enter To Location");
                        }
                    }
                }
                catch (E)
                {
                    alert(E.message);
                }

            }

        </script>

</head>
<body onload="InitializeGoogleMap(); return false">
    <form id="form1" runat="server">
    <div>
        <table border="0" cellspacing="5" cellpadding="5" align="center" width="100%">
            <tr>
                <td style="width: 20%" align="center" valign="middle">From</td>
                <td style="width: 80%">
                    <asp:TextBox ID="txtFrom" runat="server" Width="400px"></asp:TextBox>
                </td>
            </tr>
            <tr>
                <td style="width: 20%" align="center" valign="middle">To</td>
                <td style="width: 80%">
                    <asp:TextBox ID="txtTo" runat="server" Width="400px"></asp:TextBox>
                </td>
            </tr>
            <tr>
                <td style="width: 20%">
                    
                </td>
                <td style="width: 80%">
                    <asp:Button ID="btnDirections" runat="server" Text="Direction" Width="200px" OnClientClick="GetDirectionRoute(); return false" />
                </td>
            </tr>
            <tr>
                <td colspan="2" style="height:100%">

                    <table border="0" cellspacing="2" cellpadding="2" align="center" width="100%">
                        <tr>
                            <td style="width:40%">
                                <div id ="DivDirectionRouteStatus" style="height:480px;overflow: auto"></div>
                            </td>
                            <td style="width:60%">
                                 <div id ="DivGoogleMapCanvas"  style="height:480px;"></div>
                            </td>
                        </tr>
                    </table>

                </td>
            </tr>
        </table>
    </div>
    </form>
</body>
</html>


Run the Project.

Output

Click on Image for better view

Download
Download Source Code