A windows service is a program which runs continuously in the background of an Operating System. It was formerly known as NT services. Window service internally uses the Service Control Manager (SCM) of the operating system. A service must be installed in a SCM database before it can be launched. SCM controls the entire lifetime of each installed service.
Let see how to create window service in C#.net.
Step 1
Create a window service project.
On the File menu, click New Project.The New Project dialog box opens.Select Windows Service in the list of Visual C# project templates, and name the project WindowServiceDemo. Click OK.

Click on image for better view
Step 2
Click the designer to select Service1. Then, in the Properties window, set the Name and ServiceName property for Service1 to ServiceTest.

Click on image for better view

Click on image for better view
Step 3
Add functionality to your service.
Select service1.cs file from solution explorer and right click on View Code.
Whenever you open this file you find there two overridden functions OnStart and OnStop.The OnStart function executes when you start your service and the OnStop function gets execute when you stop a service.
Create a method for write a text content to the file when we start and stop the service.it is look like this
 #region Methods
        /// <summary>
        /// Write a Text File
        /// </summary>
        /// <param name="FilePath">Specify the File Path</param>
        /// <param name="Content">Specify the Content</param>
        private void WriteText(String FilePath, String Content)
        {
            try
            {
                System.IO.FileStream FS = new System.IO.FileStream(FilePath, System.IO.FileMode.OpenOrCreate, System.IO.FileAccess.Write);

                System.IO.StreamWriter SW = new System.IO.StreamWriter(FS);
                SW.BaseStream.Seek(0, System.IO.SeekOrigin.End);
                SW.WriteLine(Content);
                SW.Flush();
                SW.Close();
            }
            catch (Exception ex)
            {
                throw new Exception(ex.Message);
            }
        }

        #endregion
Now call above method in OnStart and OnStop function.
 protected override void OnStart(string[] args)
        {
            try
            {
                WriteText(@"D:\WindowService.txt", "Service Started on " + DateTime.Now.ToShortDateString() + " at " + DateTime.Now.ToShortTimeString());
            }
            catch (Exception)
            { }
        }

        protected override void OnStop()
        {
            try
            {
                WriteText(@"D:\WindowService.txt", "Service Stopped on " + DateTime.Now.ToShortDateString() + " at " + DateTime.Now.ToShortTimeString());
            }
            catch (Exception)
            { }
        }
Step 4
Create a Installers for your service.
In Solution Explorer, right-click Service1.cs and select View Designer. Click the background of the designer and right click on and then click Add Installer.

Click on image for better view
By default, a component class that contains two installers is added to your project. The component is named ProjectInstaller, and the installers it contains are the installer for your service and the installer for the service's associated process.

Click on image for better view
In Design view for ProjectInstaller, select serviceInstaller1 and right click on Property.
Set the StartType property to Automatic.

Click on image for better view
In Design view for ProjectInstaller, select ServiceProcessInstaller1 and right click on Property. Set the Account property to LocalSystem. This will cause the service to be installed and to run on a local service account.

Click on image for better view
Build the project by pressing CTRL+SHIFT+B.
Step 5
Install and Run the Service.
You need to call installutil.exe to register this service from command line.Open Visual Studio Command Prompt.
Note:If you using window vista or window 7 then run visual studio command prompt in Administrator Mode.
Go to start > All Programs > Microsoft Visual Studio 2008 or 2010 > Visual Studio Tools >Visual Studio Command Prompt (2010) and right click on Run as Administrator.
Install the WindowService
installutil E:\WindowServiceDemo\WindowServiceDemo\bin\Debug\WindowServiceDemo.exe

Click on image for better view
Unistall the WindowService
installutil /u E:\WindowServiceDemo\WindowServiceDemo\bin\Debug\WindowServiceDemo.exe

Click on image for better view
Step 6
Start and Stop the Service.
You need to go to the Computer Management to Start to start and stop the service. You can use Manage menu item by right clicking on My Computer.

Click on image for better view
Under the Service and application,Click on Services you will see the service ServiceTest.Start and Stop menu item starts and stops the service.
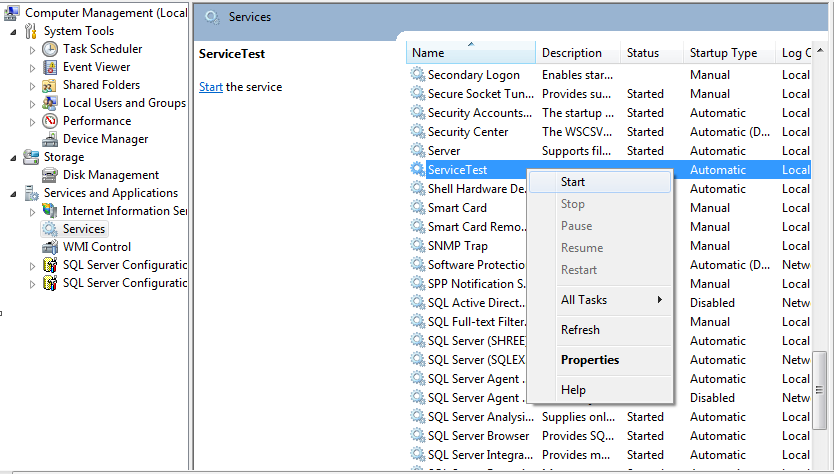
Click on image for better view
Step 7
After start the service then go to your directory and see if text file is there with contents or not.
Download
Download Source Code
Look at this interesting post
ReplyDeletehttp://keithelder.net/2011/02/12/how-to-build-windows-services-in-net-the-easy-way-with-topshelfpart-1/