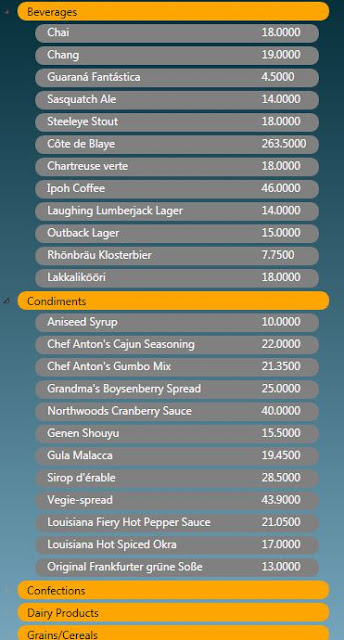
In this article i will show how to data bind in TreeView Control In WPF.
Step 1
Download Northwind database from the following link.
http://www.microsoft.com/downloads/details.aspx?FamilyID=06616212-0356-46a0-8da2-eebc53a68034&displaylang=en
Step 2
Attach a Northwind database into MS-SQL server.
Step 3
Create a WPF Application and give the solution name as SolWPFTreeView.
Step 4
Now we have to define Parent and child relationship between Categories and Products Tables from Northwind database by using DataRelation Class,create Northwind Static Class,it is look like this
Step 5
Add a Treeview control in window,it is look like this
Step 6
Create a Templates for Nodes,For displaying data in nodes first we have to create a DataTemplate for Product later we have to create HierarchicalDataTemplate for Categories and then we can add it to this template and bind accordingly. Remember to provide a unique Key for the template. Then we can use this key for referring it in ItemTemplate of the HierarchicalDataTemplate,it is look like this
Step 7
Apply ItemTemplate on treeview control,in ItemSource we need specify parent table name in our case it is Categories Table.it is look like this
Step 8
Bind the data in TreeView Control in Code Behind,it is look like this
Run the Project.
Output
Click on Image for better View
Click on Image for better View
Full XAML Code
Download
Download Source Code
Step 1
Download Northwind database from the following link.
http://www.microsoft.com/downloads/details.aspx?FamilyID=06616212-0356-46a0-8da2-eebc53a68034&displaylang=en
Step 2
Attach a Northwind database into MS-SQL server.
Step 3
Create a WPF Application and give the solution name as SolWPFTreeView.
Step 4
Now we have to define Parent and child relationship between Categories and Products Tables from Northwind database by using DataRelation Class,create Northwind Static Class,it is look like this
using System;
using System.Collections.Generic;
using System.Linq;
using System.Text;
using System.Data;
using System.Data.SqlClient;

namespace SolWPFTreeView
{
    public static class Northwind
    {
        #region

        /// <summary>
        /// Data Relation Between Two Tables Such as Categories and Products
        /// </summary>
        /// <returns>DataSet</returns>
        public static DataSet CreateDataRelation()
        {
            try
            {
                SqlConnection SqlCon = new SqlConnection();
                SqlCon.ConnectionString = @"Data Source=SHREE_DESKTOP\SHREE;Initial Catalog=Northwind;Integrated Security=True";
                SqlCon.Open();

                SqlDataAdapter SqlCategoryDa = new SqlDataAdapter("SELECT CategoryID,CategoryName FROM Categories", SqlCon);

                SqlDataAdapter SqlProductDa = new SqlDataAdapter("SELECT CategoryID,ProductID,ProductName,UnitPrice FROM Products", SqlCon);

                DataSet Ds = new DataSet();
                SqlCategoryDa.Fill(Ds, "Categories");
                SqlProductDa.Fill(Ds, "Products");


                DataRelation Dr = new DataRelation("DataRelationShip",
                    Ds.Tables["Categories"].Columns["CategoryID"],
                    Ds.Tables["Products"].Columns["CategoryID"],
                    true
                    );
                Dr.Nested = true;

                Ds.Relations.Add(Dr);

                return Ds;
            }
            catch (Exception ex)
            {
                throw new Exception(ex.Message);
            }
        }

        #endregion
    }
}
Step 5
Add a Treeview control in window,it is look like this
<Grid>

        <TreeView x:Name="ProductTreeView" HorizontalContentAlignment="Stretch" VerticalContentAlignment="Stretch">
            <TreeView.Background>
                <LinearGradientBrush EndPoint="0.5,1" StartPoint="0.5,0">
                    <GradientStop Color="#FF062F3B" Offset="0" />
                    <GradientStop Color="#FF77A7BE" Offset="1" />
                </LinearGradientBrush>
            </TreeView.Background>
        </TreeView>
    </Grid>
Step 6
Create a Templates for Nodes,For displaying data in nodes first we have to create a DataTemplate for Product later we have to create HierarchicalDataTemplate for Categories and then we can add it to this template and bind accordingly. Remember to provide a unique Key for the template. Then we can use this key for referring it in ItemTemplate of the HierarchicalDataTemplate,it is look like this
<Window.Resources>
  <DataTemplate x:Key="ProductDataTemplate">

            <Border BorderThickness="2" CornerRadius="10" Background="Gray" Width="310">

   <Grid Width="300" Height="20">
    <Grid.ColumnDefinitions>
     <ColumnDefinition Width="0.771*"/>
     <ColumnDefinition Width="0.229*"/>
    </Grid.ColumnDefinitions>
    <Grid.RowDefinitions>
     <RowDefinition Height="0.5*"/>
    </Grid.RowDefinitions>

    <TextBlock Grid.Row="0" Grid.Column="0"  Text="{Binding ProductName}" Margin="10,0" Foreground="WhiteSmoke"></TextBlock>
                <TextBlock Grid.Row="0" Grid.Column="1" Text="{Binding UnitPrice}" Margin="10,0" Foreground="WhiteSmoke"></TextBlock>

   </Grid>
   </Border>
  </DataTemplate>


  <HierarchicalDataTemplate x:Key="CategoryDataTemplate"
       ItemsSource="{Binding DataRelationShip}"
       ItemTemplate="{StaticResource ProductDataTemplate}">
   <Border BorderThickness="2" CornerRadius="10" Background="Orange" Width="340">
    <Grid Height="20">
     <TextBlock Text="{Binding CategoryName}" Margin="10,0" HorizontalAlignment="Stretch" VerticalAlignment="Center"></TextBlock>
    </Grid>
   </Border>

  </HierarchicalDataTemplate>


 </Window.Resources>
Step 7
Apply ItemTemplate on treeview control,in ItemSource we need specify parent table name in our case it is Categories Table.it is look like this
<Grid>

        <TreeView x:Name="ProductTreeView"   ItemsSource="{Binding Categories}" ItemTemplate="{DynamicResource CategoryDataTemplate}" HorizontalContentAlignment="Stretch" VerticalContentAlignment="Stretch">
            <TreeView.Background>
                <LinearGradientBrush EndPoint="0.5,1" StartPoint="0.5,0">
                    <GradientStop Color="#FF062F3B" Offset="0" />
                    <GradientStop Color="#FF77A7BE" Offset="1" />
                </LinearGradientBrush>
            </TreeView.Background>
        </TreeView>
    </Grid>
Step 8
Bind the data in TreeView Control in Code Behind,it is look like this
using System;
using System.Collections.Generic;
using System.Linq;
using System.Text;
using System.Windows;
using System.Windows.Controls;
using System.Windows.Data;
using System.Windows.Documents;
using System.Windows.Input;
using System.Windows.Media;
using System.Windows.Media.Imaging;
using System.Windows.Navigation;
using System.Windows.Shapes;

namespace SolWPFTreeView
{
    /// <summary>
    /// Interaction logic for MainWindow.xaml
    /// </summary>
    public partial class MainWindow : Window
    {
        public MainWindow()
        {
            InitializeComponent();

            try
            {
                // Bind The RelationShip Data
                this.ProductTreeView.DataContext = Northwind.CreateDataRelation();
            }
            catch (Exception ex)
            {
                MessageBox.Show(ex.Message);
            }
        }
    }
}
Run the Project.
Output
Click on Image for better View
Click on Image for better View
Full XAML Code
<Window x:Class="SolWPFTreeView.MainWindow"
  xmlns="http://schemas.microsoft.com/winfx/2006/xaml/presentation"
  xmlns:x="http://schemas.microsoft.com/winfx/2006/xaml"
  Title="MainWindow" Height="350" Width="525">
 <Window.Resources>
  <DataTemplate x:Key="ProductDataTemplate">

            <Border BorderThickness="2" CornerRadius="10" Background="Gray" Width="310">

   <Grid Width="300" Height="20">
    <Grid.ColumnDefinitions>
     <ColumnDefinition Width="0.771*"/>
     <ColumnDefinition Width="0.229*"/>
    </Grid.ColumnDefinitions>
    <Grid.RowDefinitions>
     <RowDefinition Height="0.5*"/>
    </Grid.RowDefinitions>

    <TextBlock Grid.Row="0" Grid.Column="0"  Text="{Binding ProductName}" Margin="10,0" Foreground="WhiteSmoke"></TextBlock>
                <TextBlock Grid.Row="0" Grid.Column="1" Text="{Binding UnitPrice}" Margin="10,0" Foreground="WhiteSmoke"></TextBlock>

   </Grid>
   </Border>
  </DataTemplate>


  <HierarchicalDataTemplate x:Key="CategoryDataTemplate"
       ItemsSource="{Binding DataRelationShip}"
       ItemTemplate="{StaticResource ProductDataTemplate}">
   <Border BorderThickness="2" CornerRadius="10" Background="Orange" Width="340">
    <Grid Height="20">
     <TextBlock Text="{Binding CategoryName}" Margin="10,0" HorizontalAlignment="Stretch" VerticalAlignment="Center"></TextBlock>
    </Grid>
   </Border>

  </HierarchicalDataTemplate>


 </Window.Resources>
 <Grid>

        <TreeView x:Name="ProductTreeView"   ItemsSource="{Binding Categories}" ItemTemplate="{DynamicResource CategoryDataTemplate}" HorizontalContentAlignment="Stretch" VerticalContentAlignment="Stretch">
            <TreeView.Background>
                <LinearGradientBrush EndPoint="0.5,1" StartPoint="0.5,0">
                    <GradientStop Color="#FF062F3B" Offset="0" />
                    <GradientStop Color="#FF77A7BE" Offset="1" />
                </LinearGradientBrush>
            </TreeView.Background>
        </TreeView>
    </Grid>
</Window>
Download
Download Source Code


Thank you. This article helped me a lot. Can you Kindly provide article for treeview with checkbox
ReplyDeleteHow to add more levels to this tree view.
ReplyDeleteC# binding KetticTreeView to data in .NET
ReplyDeleteIf I add new Category to database, how to auto refresh.
ReplyDeleteHi.. Kishor....
ReplyDeleteYour all step step codes are very helpful to understand.
Kindly provide how to add more levels in treeview in above example.